Author: Chris Hudson

  • Process to Automatically Change Contact Owners to the Account Owner in Salesforce

    How can you align the contact owner with the account owner in Salesforce, automatically? There are many ways and reasons to do this, and unfortunately, is greater than the scope of this article. These Salesforce support requests below cover some of the use cases for this feature:

    We’ll focus primarily on creating a process to update the contact ownership to the account owner when a record is created or updated to match a certain record type. In our scenario, let’s just say that we need to have all of our Customer Contacts be the same owner as the Account Owner – regardless if Support, Finance, Marketing, Sales, Order Operations, or any other members of your organization creates a contact associated with that account record. This process will also trigger if you move account ownership from one user to the next. Here is an example request I’ve received:

    Account Ownership Change Request Salesforce

    How can we create a process to transfer ownership automatically, rather than manually?

    Using Process Builder to Update Contact Owner to Account Owner in Salesforce

    Using Salesforce Process builder makes this requirement very easy to implement.

    NOTE: If you are using several API only integration users that have access across your Org, and have many contacts associated with an Account, you may run into errors such as Too many DML rows, or the ALL_OR_NONE_OPERATION_ROLLED_BACK error. In these scenarios, you can update the Process Builder to exclude the Account IDs of accounts that cause problems, or limit the integration user from access these records.

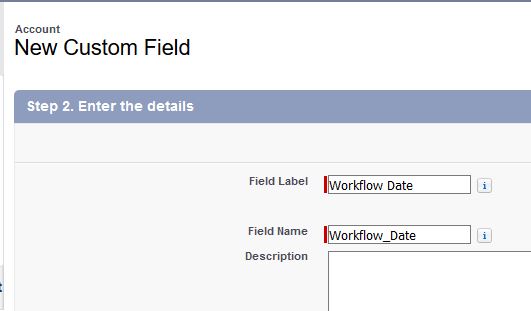
    Starting off, I’ve already created a formula on the Account Object to view  the Account Owner Id on the Account Record. If you aren’t familiar with how to do this –  create a new formula field on the Account record to pull that ID using “CASESAFEID” similar to the below image:

    How to Get Account Owner Id In Salesforce

    Got that all set? Perfect, now let’s pull up the Salesforce Process Builder, and click the create a new process. Let’s give it a name and give it a  description. (our click path would be Setup->Create->Workflows & Approvals->Process Builder). Click “new” in the top right corner. Give it a name and description. When you get to the drop-down for”The process starts when”, we’ll select whenever a record changes.

    Salesforce process builder contact owner to account owner

    What this will do is whenever an account record changes, it will invoke our process. Our second step is to add the Object that will be changed to our process. We’ll select the Account object, and set it to run whenever a record is created or edited.

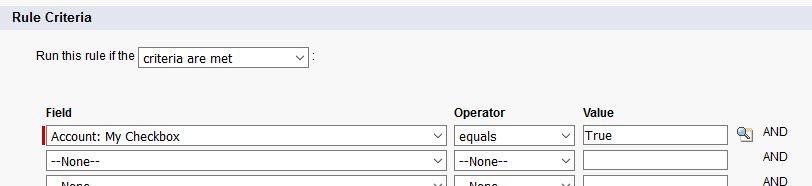
    For the next step of our process, we want to have the criteria condition be that an “Account Becomes A Customer”. To do this, we’ll pull the Account Record Type ID and have it equal to the Customer Record type we’ve set in our Org. Here is where you’ll also want to eliminate accounts that may have too many contacts. You’ll see that in the below as Account ID “does not equal” :

    Salesforce Process builer - customer account ownership to contact ownership

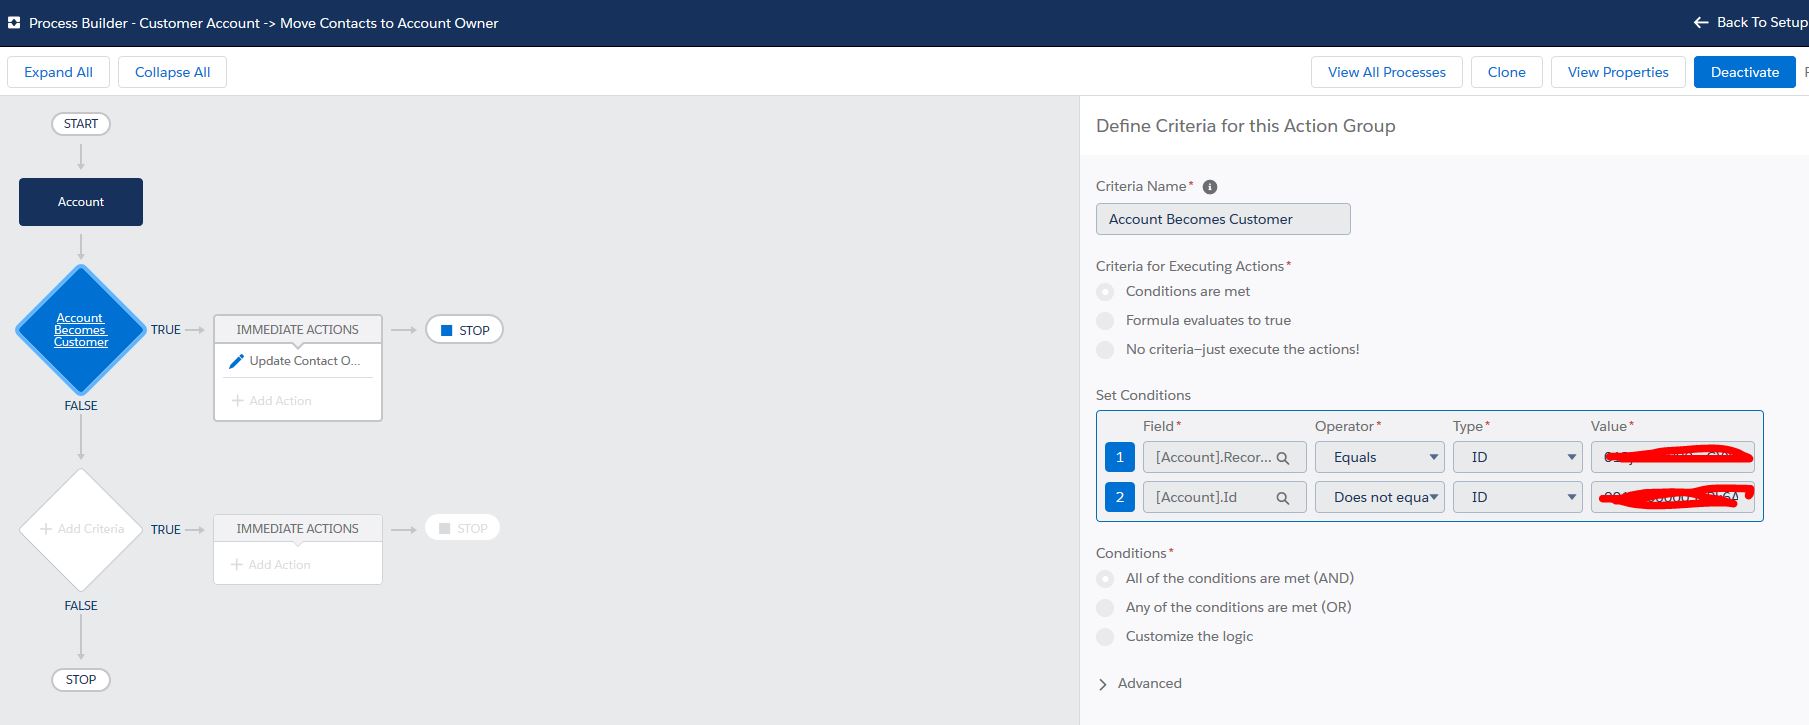
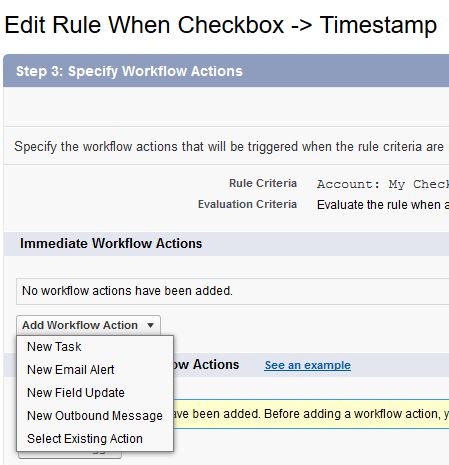
    After creating the criteria condition in the above, the next step is to “Update the Contact Ownership”. To do this, we want to filter the criteria to only include Contacts whose ownership is not equal to the account owner. In the below, you’ll see how we set that the Contact Owner ID =! AcctOwner ID. The new field value that we’d update will have the owner ID be a formula, which will pull the account owner ID and set that as the contact owner ID :

    Salesforce Account ownership = Contact ownership

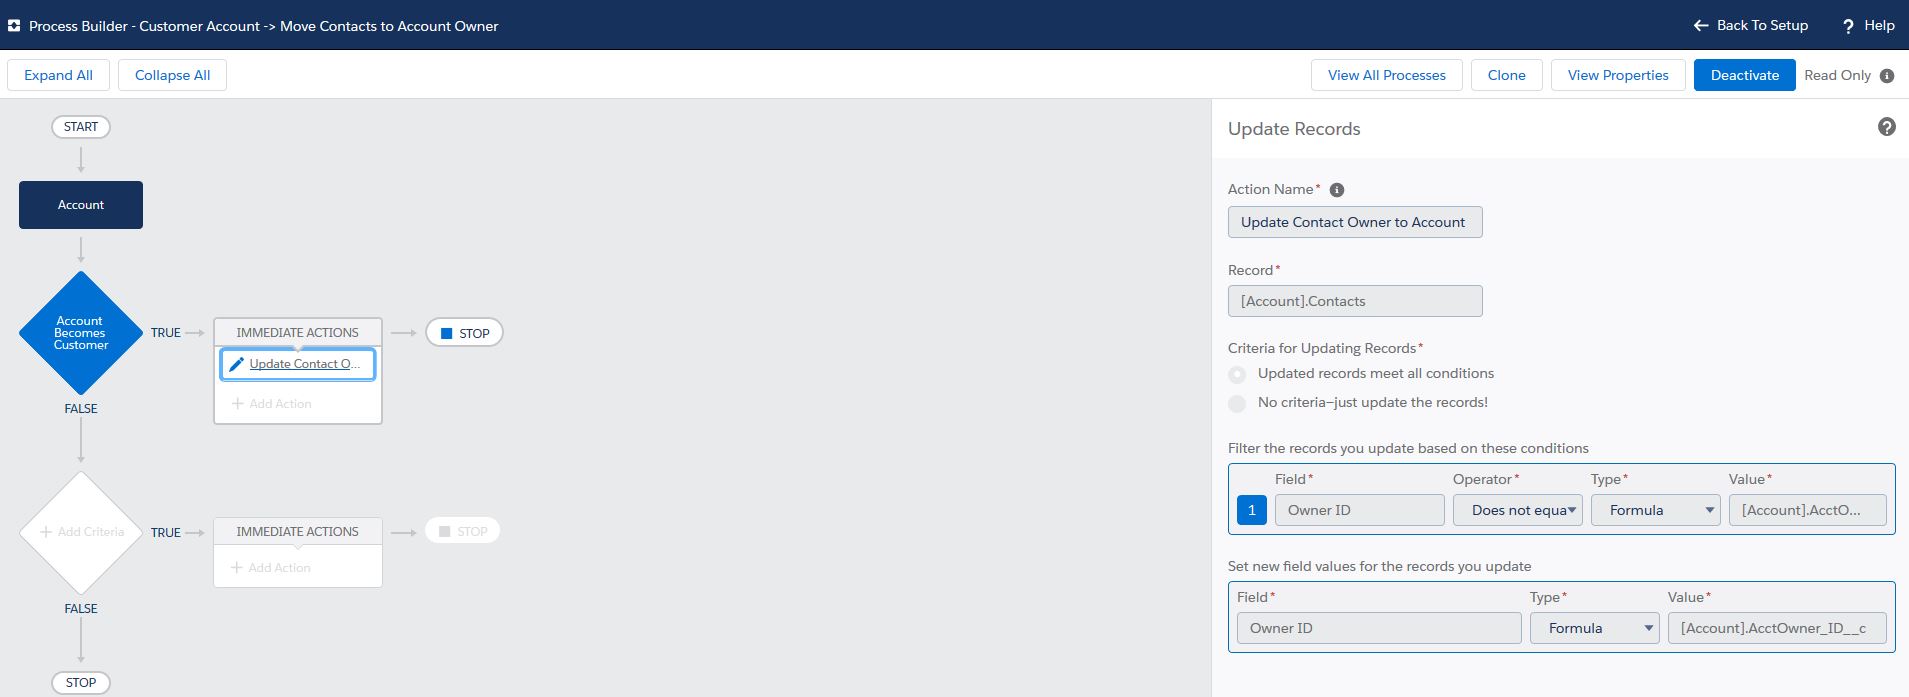
    The reason we have the contact owner not equal to the account owner id in the filter criteria is so the process does not unnecessarily update contact ownership that already  is owned  by the current account owner.

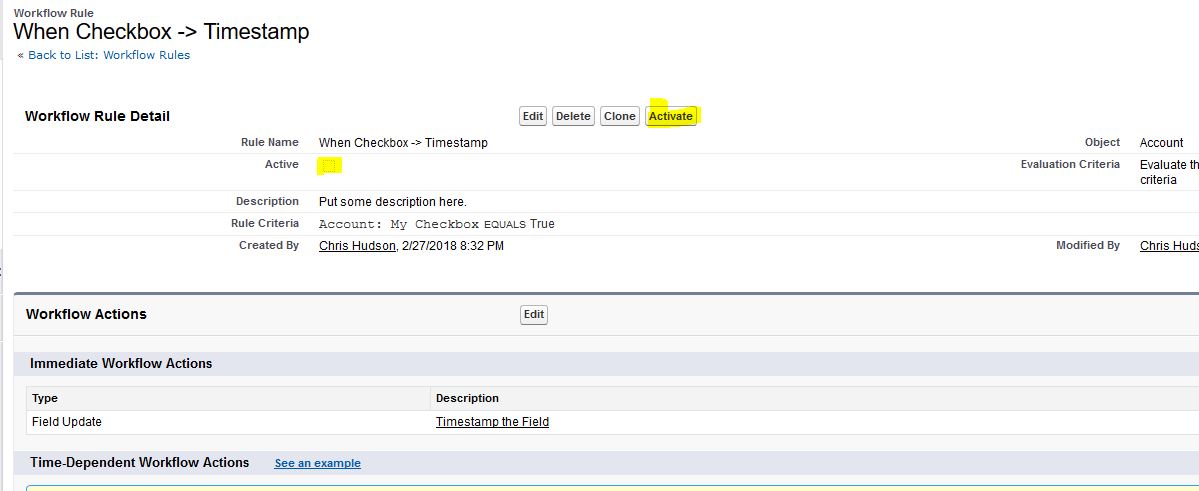
    Our final step is to activate this process, and use a Customer Record Type to test the process and confirm that it works. Congrats, we’ve successfully created a process to ensure that all contacts are owned by the account owner!

    Do you have any issues updating contact ownership with an account? Reach out to me in the comments below!

  • Generating a Geographic Heat Map with your Salesforce Account Data

    Are you trying to find where your top customers or prospects are located geographically? Being able to visualize this data in a heat map can help you figure out your top target customers, manage territory realignment, increase headcount in a certain area, and many other use cases. This article will go over how to generate a geographic heat map by using Salesforce Account Data, in particular, we will be using just the Zip Code information of account records.

    This tutorial uses Google’s Fusion Tables that can be a accessed from your Google Drive. What is phenomenal about Fusion Tables is that it is a great visualization platform that can create bar charts, pie charts, and what we’ll be using – Geographical maps – from any source of data you provide.

    Getting Started with Google Fusion Tables

    You can possibly skip this section if you already have access to Google’s data visualization tools. To get started, we’ll first head over to Google Drive. If you don’t already have a Google Account, go ahead and create one. Once there, we’re going to have to connect Fusion Tables to your drive:

    Connecting Google Drive Fusion Tables

    As you can see in the above image, I have already connected Fusion Tables, but if it’s your first time – once in Google Drive, Select “New” and  then”More”, from there, click the ‘connect more apps’ for the search screen to show up (below). Once it does,  search for “Fusion” and click ‘Install’ next to it to associate with your Google Drive:

    Associating Google Fusion tables to Google Drive

    Congrats, your Google Drive now has Fusion Tables! This next section will briefly go over exporting a report in Salesforce – if you already know how to do that, feel free to skip to the section after that.

    Exporting a Salesforce Report

    Next, you’ll want to have an export of the data you are trying to visualize. You can get that data by creating a report in Salesforce, select the Account Report type, and pull out any relevant data within the filters. We opted for Dummy Customer Accounts in our Sample Zip Data CSV. In the columns of your report, specify ‘Zip Code’ as one of the data points that we want to export. The Zip Code data will allow us to map with the help of Fusion tables & the Google Maps API. Once your report is created, let’s export the report as a .CSV.

    Now that we have our data, it is time to upload this to Google’s Fusion Tables.

    Using Google Fusion Tables to Create a Heat Map

    Let’s fire up a new Fusion Table. Go to Google Drive, and Select “New” -> “More” and then “Fusion Tables”. Once there, it will prompt you to Import a new fusion table. Select the CSV of the report that was generated earlier. As the data populates into the Fusion Table, it will look like the below:

    Uploading Sample Zip Data to Fusion Tables

    By default, the table will associate the ‘location’ as the target data point to visualize (do you see how the United States Country is highlighted?). It is easy to adjust a different column to be the data source. Just hover over the area at the header of the column, and click the arrow as it appears, and select ‘Change…”.

    Moving Fusion Tale Column Location to Zip

    This will allow you to adjust the data ‘type’ of the column to be Location (from the default “Number” that Fusion Tables associated it with).Change Zip data point to location

    Now that the Zip Code column is referenced as a location, in the “Map of Country” tab, we’ll select Zip as the location. Once you select this, Fusion Tables will start Geocoding for you.

    Geocoding in Fusion Tables form Zip

    After Fusion Tables has finalized the Geocoding, you will see a plot map of your Zip Codes:

    Fusion Tables Point Map

    It is very easy to adjust the map from displaying ‘plotted’ points to a heat map. In the left side bar section, Click “Heatmap” under “Feature map”:

    Fusion Tables - Adjusted Heatmp

    As you can see in the above image, we’ve successfully created a heat map! You are easily able to adjust the radius and the opacity of the map from this selection, making cities larger or darker should you prefer. It appears the majority of our sample Customers are located in Tampa, Atlanta, Philadelphia, Toronto, & New York. If our purpose was to visualize what cities we’d need to have a resource location near, this heatmap can easily serve that purpose.

    Feel free to reach out if you have any additional questions. If you have other uses for Fusion Tables or use-cases for Heatmaps, please leave them in the comments below!

  • Creating and Documenting a Dunning (Collections) Process

    Having cash in the bank is a vital requirement to run a successful business. Being able to pay your vendors, employees, and other company debts on time can ensure that a organization can continue doing business. Sometimes a business’ runway is short, and if it is venture-backed, may need to raise another round of funding, or if not, take a loan in the form of issuing bonds, or an accounts payable line of credit through the bank. In more dire circumstances, not having enough cash can cause the company to file bankruptcy, or the company may fold as secured creditors aim to recoup some of their losses.

    Since having cash in the bank is so important, so too is having a methodical collections process that is documented and can be adhered to. This process is known as a Dunning Process, from the word ‘dun‘ which means ‘to demand payment of a debt’.

    Defining the Quote to Cash Process

    To grossly simplify the Quote to Cash process for an enterprise software company, it typically looks like this:

    1. A Sales Quotation is signed by the customer.
    2. A matching Purchase Order from the customer is created.
    3. An Order is booked internally.
    4. An Invoice is generated and sent to the customer.
    5. The Customers pays the invoice per the agreement.

    Payment terms that are agreed upon by two corporations or entities, with a matching Purchase Order and Signed Quotation, should be what is required to book an Order. These two forms of paperwork become the enforceable contract if any disputes arise. Likewise, having a bulletproof (lawyer reviewed) Terms of Service that is associated with the signed Quotation, along with a non-payment clause within those terms, will make sure that you are able to collect on your Account’s Receivable.

    During the booking stage of an order, there are checks and balances that can be performed during this time. Some checks and balances can be put into place here, with the Order’s team asking questions like:

      • Does the Quote & accompanying PO match the customers ship to & bill to address?
      • Are the payment terms and dates of the contract the same?

    If there is an issue, then Orders can reject the booking, and have it go back to the Sales Rep to fix any mistakes. These checks and balances can be paper-based or through an online audited system such as a CRM or ERP.

    Now that the order is booked, and an invoice has been sent – what happens when a customer doesn’t pay? If the previous Order Processing steps had no inconsistencies, the customer account could fall under a Dunning Process. As an example of an inconsistency that could arrise would be if there were Net 45 terms on the Purchase Order, and Net 30 on the signed Quote – typically a larger firm will pay per the issued PO, and not what was agreed upon in the accompanying quote. This is why the checks and balances are important during booking an order.

    What is a Dunning Process?

    As we went over previously, a dunning process is the ‘demand of payment of a debt’. What a process looks like in practice can be more along the lines of gentle reminders of a past due invoice, such as emails or phone calls to confirm the payment status of that invoice. Once an invoice becomes 60+ days past due, it can become delinquent, which can have the tone of the communication become more firm in the reminder of an overdue payment. Depending on the product or service that a company provides, a material breach of the contract can occur after this point, which can be enforced with the help of an outside legal collection agency. These debt collectors take over the accounts receivable, and attempt to collect what is owed. Sometimes, additional charges such as late fees (or dunning fees) can accumulate on the debt.

    Example Dunning Process:

    A sample dunning process for a SaaS organization can look something like this:

    Past Due: Invoice Due Date + 7 days.

    Accounting/Finance can give a week for transmittal of payment by a check to a physical address from a customer. If the invoice is more than 7 days past due, an email reminder can be sent to the accounting or account’s payable email address on file, and a phone call to the department to inquire on the payment status is warranted. Typically, the majority of customers will fall into this bucket if they fall in the Collection’s process. Sometimes issues arise that can be found, such as incorrect ship to or billing address or names, no PO # addressed on the invoice, or not submitting the invoice in the correct manner.

    Delinquent: Invoice Due Date + 30 days.

    Once an invoice is more than 30 days past due, it then becomes delinquent. Another phone call or email to the account’s payable team is recommended, as is looping in the internal sales rep as well as the champion contact at the customer. Here you may find out cashflow issues from the customer, or other problems may arise.

    Severely Delinquent: Invoice Due Date + 60 days.

    After an invoice becomes more than 60 days past due, it is then in danger of being sent to a legal outside collection agency to follow up on. If your company provides software as a service, sometimes prohibiting access may be warranted to expedite payment (Be sure to reference your company’s TOS and confirm if this action is allowed).

    The process as a customer moves through the stages from Past Due to Delinquent, or from Delinquent to Bad Debt (sent to a collection agency), can be decided by and agreed upon by the Finance and Sales teams. Likewise, you’ll want to have input from your Legal team as well. Sometimes this process can be fluid, and exceptions to the rule can be made. If the process is documented, your organization will may also have the ability to automate certain aspects using a CRM or ERP tool.

    I want to make a note: It is typically unlawful to harass or threaten customers who have a debt with a company, and I would never condone such behavior.  If you do use an outside legal collection agency, be sure to have a reputable company that will represent your position lawfully. Customers are the key to a company’s success, and should be treated that way.

    Automation of the Dunning/Collections Process

    In a future article, I will go over the automation of a dunning process using Salesforce.com. Depending on how your organization’s business systems are set up & what your organization sells, certain tools or elements may manage your order booking, invoicing, and collections of accounts. Business tools such as a CPQ (configure/price/quote), CRM, or ERP system can manage this Collection’s process interdependently.

    Now that we have the fundamentals of what a Dunning Process is, this future article focuses on how to manage and automate the Collections Process from a Salesforce.com perspective.

    Is there a documented Dunning process at your organization? If so, how does that compare to the example outlined in the article? Please leave your thoughts in the comments below!

  • Two Ways to Populate a Date Field Based on a Checkbox in Salesforce

    There are a few ways that you are able to implement timestamping a date field based off of checkbox in Salesforce. This article will go into two different ways to solve this requirement, and in between will discuss the trade-offs between using each potential method.

    Automation of timestamping has a variety of uses. This process can be used to track different stages of an opportunity’s lifecycle, figure out when a field was last updated, setting a future task, and many more use-cases.

    From a timestamp, you are able to report on the exact date a closed opportunity was created, qualified, and when a user sent out the quotation. You can also use the timestamp to set future follow up date on the field. Lastly, you can figure out the last time the field was updated, and follow back up on those Accounts/Contacts, or Opportunities that may have become stagnant.

    How to Timestamp a Date Field in Salesforce

    The two ways to timestamp a date field in Salesforce are:

    1. Creating a formula field that updates to now or today.
    2. Using a workflow rule and a field update.

    In the first section, we’ll go into how to use a formula field to manage this requirement.

    Method #1: Creating a Formula Field to Timestamp a Date

    The first method of timestamping a date field is to make a formula field that will return a date. This is assuming you’ve already created the Checkbox field. Let’s create our new field, and set the field type to “formula”:

    Step one of creating a new Salesforce Formula Field

    We’ll want the formula to return the output as a “Date”. Don’t forget to add a field label/name!Step Two of creating a new Salesforce Formula Field

    In this field, you’ll want to set it up with the following formula:

    IF( checkbox_field__c = TRUE, NOW(), NULL)

    Where the checkbox_field__c is the name of the checkbox field you have.

    Step Two of creating a new Salesforce Formula Field to timestamp a date field

    What the above formula does is see if the Checkbox we created is checked (or True in the above), and it will make the formula return the date as date “Now”. This method is great as it is relatively straightforward formula to timestamp the date, and unchecking the Checkbox Field will remove the date.

    What if you wanted to keep the date until removed by a System Admininistrator or other user? That is the one caveat the formula field has – if  the checkbox is checked, the formula will give (and keep) whenever NOW was. On the other hand, if the checkbox moves to unchecked, it will remove the date field in the formula. In the next method, using a field update will keep the date until removed by a user.

    In the next section, we’ll go into how to use a workflow rule and field update to manage our requirement of timestamping a date field.

    Method 2: Using a Workflow Rule & Field Update to Timestamp a Date

    Using a workflow rule & field update that can timestamp a date field is a little bit more work to implement, but does not have the draw back of the formula method. Removing the checkbox will cause the formula to not return ‘true’, and can erase valuable historical data down the line.

    First, we’ll just create a ‘date’ field. Again, we’re assuming that the Checkbox field is already created:

    Next, we’ll want to create a workflow rule. We start this by selecting the object that we want the rule to apply to. In our case, it is the Account object.

    The next step is to give it a name, and decide the evaluation criteria.

    Part of the rule criteria process is seeing that the checkbox we created, “My Checkbox” turns true:

    What a workflow rule does is that it takes a look at conditions, and if true, provides actions. These actions can be sending emails, updating fields, creating tasks, or creating an outbound message. In our case, we’ll want to create a new field update. What this will do is tell the workflow rule to update the field that we will define.

    Here we tell the new Field update to timestamp the Workflow Date field with the formula, which is just “Now”:

    Once that has been created, let’s activate the workflow rule:


    Now that the workflow rule & field update have been built and activated,  let’s just verify that it works by checking the box on the Account page:

    Congrats, it works!

    Differences and Use Cases:

    Each of the above methods are two distinct ways that can have varying use cases that are different in each circumstance. There is actually a third and final way to solve this requirement, and that follows the KISS Principle. Keep It Simple. After learning about the requirement from your end user, sometimes all that is needed is one person or a team of people to take ownership of the dates. We solve this by simply creating a date field, and locking it down to specific User Profiles or lock it down completely, and provide access through permission sets.

    Which method do you use to timestamp date fields? Let me know in the comments below!

  • Account Based Scoring Methodology in Salesforce

    Having a robust Account-Based Scoring Methodology in Salesforce can help you separate the wheat from the chaff in your prospect accounts. This will allow your sales team to quickly follow up on leads that might have a low lead score, by prioritizing the account fit in your target market.

    Account based scoring is similar to Lead Scoring Methodologies, which are, in essence, just an individual score for a single person (in Salesforce as an email contact/name/etc). Key components of a Lead Score can be whether this ‘person’ is downloading content from your site, visiting key pages and/or many pages in one session, how frequently they visit, and other key factors.

    NOTE: I will be sure to elaborate more about lead scoring best practices in another article in the future, so stay tuned!

    Likewise, if you are able to discern what your target market Customer company looks like, you will also be able to score these accounts. Some key components are easy to find, and others, not so much. For example, things such as Location, Employee Size, Industry, and Revenue can help you zone in on which companies you are a best fit with. Some of these factors should be relatively easy to identify and locate the accurate information of. For example, if you are located in the SF Bay Area, and you are a service company, you may want to score an Account higher if they are within your service location. Similarly, if you sell analytical software for tracking visitors on ecommerce websites, knowing that your prospect’s industry is Ecommerce (they use Shopify/Bigcartel/Magento, or some other ecommerce software)  would mean that they, more often than not, could be within your target demographic.

    There is other data that may not be so easy to find out. For example, say you sell a bolt on plugin for users of Microsoft Outlook. Knowing that your prospect has that software as their corporate-mandated email service would most likely include them as a fit within your target market. There are multiple vendors who can provide this data [for a fee] that I have had experience working with, such as Builtwith, Datanyze, Hunter.io, and HGData.

    The exercise of identifying key components of your target demographic will be left to another post. What is relevant here is that this data can also be included in an Account Based Scoring Model.

    Creating an Account-Based Score in Salesforce

    Creating an Account Based Score in Salesforce, in practice, is easy to implement. After you’ve identified the attributes of your target customer, you can then start tracking that data. You’ll first need to have fields that you can capture the relevant data in. Let’s create four sample fields in a hypothetical scenario, where each will have four picklist values as well:

    A) An Industry field with picklist values of:
    -Software
    -Real Estate
    -Distribution
    -Service

    B) An Employee Size field with picklist values of:
    0-10
    10-99
    100-999
    999+

    C) A Location field with picklist values of:
    -United States
    -Mexico
    -Canada
    -Canada

    D) A Revenue field with picklist values of:
    -$0-$100k
    -$100k-$1mm
    -$1mm-$10mm
    -$10mm +

    NOTE: In practice, these fields may not be necessary. For example, you can use the selection of “Billing Country” within Salesforce or another CRM to build out the scoring formula field in the next section.

    Account Based Scoring Best Practices

    For best practices, and to get the correct score on your prospect Accounts, each of the above picklist values can have an associated score as well. Let’s say we’re going to figure out the Account score on a 0-100 point scale, and we decided to give equal weight to the four scores to each of the fields that are attributes of your scoring model. We would then have to decide the individual score of each picklist value in each field above. We can give each picklist value a score of “0-5”, because we’ll be using the Salesforce CASE function in a formula on a each field as a score.

    To use the CASE Function to figure out the score of each picklist value, we’ll create four new fields: Industry Score, Employee Score, Location Score, & Revenue Score:

    For the each of the attribute fields, we’ll create the associated scoring field in the same process. As an example, we’ll just create the Revenue Score field here. Create a new field on the Account Object, and set field type as a Formula. Have the field return a number. In our hypothetical company, let’s say that we have found success selling to companies in the $1 million to $10 million dollar range. For small companies, with found only some success to selling to them if they have revenue with less than $1 million, but not as much as the sweet spot. Let’s also say that we don’t sell to enterprise or small seed stage startups due to long sales cycles and churn rate, respectively. We’ll say the our sweet spot revenue is a ‘5’, and the secondary revenue figure is a ‘3’, while the rest would be 0 (or null). To create the Formula field, we’ll set it up like this:

    CASE(Revenue__c,
    “$1mm-$10mm”, 5,
    “$100k-$1mm”, 3,
    0)

    What this formula does is look at the Revenue field (Revenue__c), through the case object, if it has the picklist value of “$1mm-$10mm”, it will return 5. If Revenue has a picklist value of “$100k-$1mm”, the Revenue Score will return 3. Now let’s save the formula. We don’t have to add this to any page layout. Do this for each of the other three scoring fields.

    To bring this Account Score all together, we’ll create another Formula Field that sums up the four Account Scoring fields. Let’s called this field Account Score. Since we said our Account Score will be based on a 100 point scale, and each account score is given equal weight, we can create the account score formula as follows:

    (Industry_Score__c + Employee_Score__c + Location_Score__c + Revenue_Score__c) * 5

    What the above formula will do is sum the values from the CASE formulas in each of the “Score” Field. Again, these CASE formulas will return a number based off the picklist selections of the Account Based Scoring model we developed. Since each picklist value will be scored as a maximum value of 5, if we summed all four score fields at the highest score, they would equal (5 + 5 + 5 + 5) * 5, simplified to 20 * 5, or return the score of 100 in the Account Score formula field above. Any picklist value of the attribute fields with a score below 5 will fall along the spectrum of 0-100 points.

    Once these fields are created for the account records, you can then add them to your Prospect and/or Customer page layout.

    Congrats, you’ve successfully created an Account Based Scoring Methodology in Salesforce!

    Let me know what factors you might have to identify your target customers in the comments below.

  • BANT, CHAMP, and MEDDIC – What are the Best Sales Methodologies?

    BANT, CHAMP, and MEDDIC – What are the Best Sales Methodologies?

    In  Sales Qualification, especially when selling enterprise Software, there are a few Sales Methodologies that are best represented by their acronyms –  BANT, CHAMP, & MEDDIC. There are other methodologies, and probably many more that will be created in the future as well. Since I’ve personally only dealt with the above few, that is what I can speak about, and what this post will focus on. The below three sales methodologies can be summed up easily. In essence, all Sales Methodologies basically focus on finding out the below information from a prospect:

    1. Does your prospect have money or a budget to pay for your product or service?
    2. What is the business pain the prospect is experiencing that your service can solve?
    3. Does your prospect have the authority to make the decision to purchase your product or service?

    The first Sales Qualification Methodology that I’m most familiar is BANT. This Sales Methodology was developed internally at IBM, and is used in specific Sales Opportunities to qualify a prospect through the opportunity’s stages.

    BANT (Budget, Authority, Need, Timing)

    BANT stands for:

    1. Budget: Does the prospect have the money to pay for your software?
    2. Authority:  Does the prospect have authority to make the purchasing decision?
    3. Need: Does your software solve a business pain?
    4. Timing: When will the prospect buy (ASAP, next month, in a year)?

    In each of the above sales qualifications components, you can associate a score based off of the picklist value in Salesforce, to end up with a BANT Score. From there, you can restrict the movement through the opportunity sales process until the decided upon score has been reached.

    When selling to enterprise companies, BANT may fall short in a few areas. Specifically, the Authority qualification of BANT may have multiple people or a committee that will need to sign off of the purchase. For example, a User (possibly an internal champion) may have both the Need and Budget, however internally, the prospective company requires sign off from an executive sponsor and legal team to procure your solution. Another shortcoming in BANT, the location of where the Qualification stages fall in the BANT word – first the Budget, and then the Need qualification – does not accurately portray what is a priority to a company, and why they have become a prospect in the first place – which is typically solving a business pain,  or in BANT, represented by the Need.

    CHAMP (CHallenges, Authority, Money, Prioritization)

    To solve one of the above issues in BANT, the next Sales Qualification Methodology, CHAMP, was created.  CHAMP stands for:

    1. CHallenges: What is the business pain?
    2. Authority: Can the prospect sign off on the purchasing decision?
    3. Money: Do they have a budget?
    4. Prioritization: Is this a top priority that needs to get solved now?

    The entire reason that a prospect can be qualified initially is that they have a problem or business pain that needs to be solved. What are the prospect’s specific business challenges? In an effort to not waste your sales team time and get bad prospects into the sales cycle, the first disqualifying questions that need to be asked would focus around the prospect’s environment, and the challenges that they are experiencing. CHAMP, in essence, is very similar to BANT, but differs on where to place the emphasis falls in the sales cycle in qualifying a prospect. Like BANT, you can easily create a CHAMP Score for the above picklist values, and restriction through a validation rule how your sales team and users are able to move through the sales cycle. However, similar to BANT, CHAMP lacks the granularity of selling to enterprise organizations, where decisions need to be sent up the chain, and ROI, or return on investment, needs to be identified and correctly measured.

    MEDDIC (Metrics, Economic Buyer, Decision Criteria, Decision Process, Identify Pain, Champion)

    MEDDIC is the last Sales Qualification Methodology that solves the above issues that BANT & CHAMP both have. MEDDIC stands for:

    1. Metrics: What is the key performance indicators, and the return on investment for the prospect?
    2. Economic Buyer: Who at the prospect’s organization will commit their budget to acquire your product or service?
    3. Decision Criteria: What are the specific criteria to purchase?
    4. Decision Process: Who needs to approve the decision to purchase?
    5. Identify Pain: What is the business pain, and objectives to purchase?
    6. Champion: Within the prospect’s organization, who will be the person that fights the internal battles on your company’s behalf?

    If your business is selling software to enterprise companies, typically this may cause a shift in the way companies process their mode of business. For example, if the prospect used spreadsheets (Excel) or paper-based system to track inventory at a warehouse, moving them onto an ERP (Enterprise Resource Planning) system would be a huge paradigm shift requiring changing roles, processes, and responsibilities across many cross-functional teams at the organization. What sort of metrics does the prospect want to improve – Could it be order shipping times or reducing lost merchandise? Who in the organization will allocate and spend their budget?

    Another key thing that MEDDIC differs from the other sales methodologies, is that it includes a Champion in the qualification of a prospect. Typically, a champion is an internal person or people, sometimes a user of the product/service, or a manager overseeing them, that will push forward within the prospect’s organization to acquire your product or service. The best way to leverage a champion is to arm them with as much information as needed to get the ball going.

    Some companies may not necessarily have these exact processes outlined to follow these methodologies strictly.  When improving a sales process, you’ll want to take the above methodologies and mold them as you see fit. You could have a champion field required at a certain sales stage, however, use the BANT (and not MEDDIC) Sales Methodology to score your opportunity. To be honest, there is probably no “best” sales methodology. Each company and industry is unique, and what may work for one organization will not work as good in another.

  • Building Custom Report Links in Salesforce

    How do you build a custom report link in Salesforce that can change the outcome of the report based on the record the link is viewed from?

    This article is a follow up from the Salesforce URL Hacking article I recently wrote. If you haven’t checked that out yet, or are a beginner in Salesforce URL hacking, I’d recommend reading it first!

    I had a requirement from a user that needed to see all relevant activity history of the Account page, and was wondering if I could build out a dynamic field that listed all the information:

    Salesforce Contact Replied field Request

    After meeting with my colleague and getting a better understanding of their requirement, we came up with the idea to have a dynamically generated report placed on the Account Page layout.

    How to Configure Custom Report Links

    The requirement from my user would be to show the relevant completed tasks on the Account in a report, based on whatever Account record that they were viewing. Creating this solution is known as a Custom Report Link in Salesforce. Custom Report Links allow an Admin to create a Report based on the Salesforce ID of the record the link is placed on. You are able to associate whatever other filters on the report, and have them appear in this custom link as well.

    The first step to create the Custom Report Link is actually creating the report itself. What you’ll want to do is go to the Reports Tab, create a new report, and open up the “Activities with Accounts” Report Type. You can easily do so by searching “Activities” in the Quick Find box.

    How To create an salesforce custom activities link report

    I sat with my colleague to figure out a specific account to develop some of the filters that they would consider “Notable Activities” in the Activity History section. We then created a report to include all the relevant filter information. For this example, we had the report filter look for all activities that had the subject contain “Call: Contacted”. Next, we added the Account ID of the specific account to the filter in the report. The ID was selected from the URL of the Account Record we were on.

    All Completed Activities in Salesforce Reports with Relevant Filters
    You’ll want to make sure that you are showing Completed Activities and that the Date Range is Null, so that it will search “All Time”.

    Once the report was created and showed the ‘Notable Activity’ of that specific account, we edited the filter so Account ID would equal “”. This should show zero results in the report. The reason that we do this will be explained in the next section. Before we head there, we must do two quick things:

    A) Save the Report with a unique name, and be sure to click the “Save & Return to Report” Button:

    Saving the custom report link with a unique name.

    B) Get the Report URL, and copy the Custom Report’s Unique Identifier:

    SDR Noteable Activities Report Link

    Creating the Salesforce Custom Report Link

    Now we’ll be creating a the Custom Report Link for the Account page. You’ll want to be in your setup, and in the quick find box type in “Buttons”. Next, find the highlighted link under Accounts:

    Buttons Links and Actions in the Salesforce Setup Menu

    We’ll be creating a new Custom Button or Link. You’ll now paste in the Custom Report Link you have copied in the section B from above:

    Customer Report Link for Account URL Detail Page

    Passing Parameters through the Salesforce URL.

    Are you familiar with passing parameters through a URL? If not, check out the Salesforce URL Hacking article. That should answer your questions you might have here.

    The parameters you can pass are considered a Parameter Value, or PV for short. In software development, all arrays start with 0 (Zero). The first parameter is the Subject, or pv0, and the second parameter, pv1, is going to be the second filter in our report. We are able to send the Account ID from the page the Custom Report Link is going to be located. If you had multiple parameters you wanted to pass, you can chain them in the Salesforce URL.

    Now we can save the Custom Link from above, and add it to the page layout.

    Salesforce Custome Report link on Account Page Layout for Noteable Activities

    When your users click the link in the above, they will be able to see the defined ‘Noteable Activities’ based on whatever Account Record they enter in from that custom link.

    NOTE: You’ll want to make sure that your users don’t change the custom report (add/remove filters, etc), or it can affect the functionality of the link. You could save the report in a folder that users have ‘view’ access, but not edit or manage access.

    Hope you enjoyed this article! Have you had any other Custom Report Links for alternate use cases? Please let me know your thoughts in the comments below.

  • Salesforce Objects and URL Hacking

    Salesforce Objects and URL Hacking

    What is Salesforce URL Hacking? I’ve been curious about how Saleforce Objects are setup up in reference to the URL format, and see if users and admins are able to make custom URL “Hacks” that can be quick actions to save time for your users . Some use cases I’ve since developed solutions for are creating and closing records like tasks & cases, easily creating a contact & opportunity with pre-populated fields,  or even passing parameters through the URL based on field values of an account to generate custom reports. Before we go into that, I’d like to provide the basics of what URL hacking is and how we can use it in Salesforce.

    PLEASE NOTE: URL Hacking is not supported by Salesforce, and the URL format can be subject to change without announcement. Situations like enabling Lightning require you to enable the My Domain feature and possibly instance migrations can affect the URL schema. Salesforce has created Quick Actions you can create in response to this technique. Do this at your risk!

    Salesforce URL Hacking Overview

    This all started with how most of my understanding of Salesforce functionality starts – a user requests a specific requirement, and I figure out how to solve their need. Unfortunately, I exhausted all of my resources, and turned to Salesforce support. As it turns out, what I was doing was not supported, and couldn’t get additional assistance from them. You can view the response from Salesforce Support below:

    Response Salesforce Support Url Hack

    I was very curious now, and wanted to explore more about URL hacking, and how I can leverage it to solve specific business requirements from my users. First, we’ll go over the basics of URL hacking:

    URL Hacking and Salesforce Objects

    First we’ll start off by seeing how the base URL is formed in Salesforce. We have the basic Salesforce url here: http://XXXX.salesforce.com/ , where XXXX is your Instance of Salesforce (server location), or your My Domain (if it had been setup). Typically, anything after the backslash  (the ‘/‘) after .com is where the salesforce objects and record IDs live, as well as the HTTP request parameters.

    For each record, they are typically 16 digit or 18 digits long after the instance url – so http://na33.salesforce.com/XXXXXXXXXXXXXXXX. The first 3 digits after the backslash will typically represent the object that is referenced.

    Here are some of the Salesforce Standard Object types that I’ve found and have access to:

    00O (zero zero Oh) = Reports
    001 = Accounts
    002 = Notes
    003 = Contacts
    005 = Users
    006 = Opportunities
    007 = Activity History
    00T = Tasks
    00U = Calendar
    00P = Attached File
    00Q = Leads
    500 = Cases
    501 – Solutions
    800 = Contracts
    01T = Products
    01Z = Dashboards
    015 = Documents
    701 = Campaigns
    a0F = Customer References
    a0G = Campaign Groups
    0BM = Connections

    This list is not comprehensive & does NOT include any objects that can be added by an installed/managed package, or other objects that you’ve created and are “Custom Objects”. Each of these Objects will each have their own unique Salesforce three-digit Object Code. (If you know of any other Object record IDs, please share them with me).

    Now, comes the interesting part. An opportunity will follow this ID code: 006XXXXXXXXXXXXX. If you are a smaller org, it will look something like 0060000000000002xWh, representing a single Opportunity record. For some objects (not all!), to find the new or edit page, the URL structure that just follows the object URL reference with a blackslash and an ‘e‘ after.

    In the opportunity example, http://na33.salesforce.com/006/e would be a new opportunity edit page on the na33 Salesforce instance.

    In HTML, the GET method can be pushed through the URL by appending a ‘?‘. In the case of creating a contact, it would look something like:

    http://naXX.salesforce.com/003/e?retURL=0010000000XXXXXX

    In this case, we have the Salesforce URL followed by 003/e, or the Contact’s Edit page, with the retURL meaning what URL you will go back to once you click Save or Cancel.

    To create a contact, we’d want to pass over parameters like the retURL, or Return URL, the Record Type of the contact, and the Account ID (accid) as well. That would look something like:

    https://na33salesforce.com/003/e?retURL=%2F00100000002Tv8c&accid=00100000002Tv8c&RecordType=0120000000000AR&ent=Contact

    The & in the above is how you can string parameters together in the GET request.

    Sending parameters through the Salesforce URL

    Let’s take the Task object in this example.

    Salesforce Tasks tasks are the URL code – 00T

    So /00T/e – will let us set the task edit page.

    We’ll then string the GET request by adding a ? after the e.

    So far, so good – we’re at /00T/e?

    And now, for Tasks, we have to figure out what each field on the Task object does based on the URL GET parameter.

    For Tasks, here are just some of the parameters we can pass (I will go in more detail in a later post):

    tsk1= Who is the Task Assigned to?
    tsk2= What is the Related Contact ID?
    tsk3= What is the Objects name
    tsk4= What is the Due date
    tsk5= What is the Subject
    tsk12= What is the Task’s Status
    retURL= Where to return when saved

    Here’s a basic example situation for the URL Hack use case that we can create:

    An unknown person calls the Main Sales line, and an inbound Sales user wants to quickly open a new Task from any page in Salesforce to get ready to jot down notes about the conversation. To do that, the user can click on a custom link (that we will create) located on the sidebar, that will have the Subject (tsk5) set to “Call: Sales Line” and have the Status (tsk12) be “Completed”. The Custom Link URL structure would look like:

    /00T/e?&tsk5=Call:%20Sales%20Line&tsk12=Completed

    This will allow them to quickly update the Task’s Comments section of the call, and associate the task with a Contact or Opportunity if existing already in the CRM. To do this, you would go to the Custom Links section in setup, and create this custom link to add to the sidebar. (Article will go here when completed!)

    You could of course add on to the above URL schema to string other parameters to pass through and save with the Task record that the link creates.

    Creating URL Hack in Salesforce

    So how can we implement this for our users in Salesforce? As seen above in the Task use case, we can create a custom link that allows a user to quickly populate the Status and Subject fields of a task, where they can write some notes quickly, with less clicks, and by able to focus their attention to the prospect.

    For many use cases, I’ve implemented Custom Links on the Sidebar or Custom Buttons & Links above an Object’s record (on the page layout) to perform these actions.

    In future articles, I’ll showcase and walk-through some of the URL hacks I’ve personally created. These include populating Reports based on the Account record the link on the page layout is clicked,  being able to fulfill tasks & cases quickly (more of the above), and being able to quickly create certain contacts or opportunity types to save time for your users.

    Have you created custom URL hacks for your Salesforce Org? What are your thoughts on the future of URL hacks and migrations to Quick Actions? Share with us in the comments below!

  • Why is the Salesforce Opportunity Amount Field Locked?

    A common question that I’ve been asked by a few users over the years – why is the Salesforce Opportunity’s Amount field locked? When I was just learning Salesforce, it made no sense to me. Every opportunity that I’ve encountered could have the Amount field entered in ad hoc as a number field. In the scenario I was presented, it had a ‘locked’ button when there usually was meant to be a pencil, meaning I can edit. I’ve recently been asked this from a User, and here is a recent screenshot I’ve received:

    Opportunity Amount Field locked in Salesforce

    I figured I’d write up an article to explain why an Opportunity Amount field is Locked. Usually, what I do is ask the User to send over to me the URL of the Salesforce record they have an inquiry on.

    In these situations, an initial thought is always – was the record locked due to being within an approval process? I looked at the opportunity’s approval history and saw that it wasn’t being sent through an approval, so the record shouldn’t be locked due to that. Before receiving that screenshot, I asked, did you see an error that another user (integration or otherwise) was trying to gain exclusive access to the record? Only one person (or integration user) is able to update a record at a time. Looking back to the first time I encountered this issue, it was odd, but as I was scrolling through the record – it turned out, there were opportunity products on the record, even though it was still within the initial stages.

    When I inquired to the user why there were products synced with the opportunity, they informed me that this opportunity was just assigned to them from another user, and instead of closing out the Opportunity, they moved the Sales Stage back to initial. Typically, as a business process, once opportunity products are synced to the record, it is usually in the later stages.

    We can certainly discuss the positives and negatives of allowing a Salesforce user to progress back through Sales Stages in another post, however – the reason that the Salesforce Opportunity Amount field is locked is due to the Opportunity Products associated with the Opportunity. These Opportunity products are then rolled up into the Opportunity Amount field. It makes sense that, if an opportunity has products, if you want to be able to accurately forecast your opportunities, the Amount field field must become locked to coincide with the value currently on the record reflected through the products.

    Unlock Salesforce Opportunity Amount Field

    There are two options to consider how to move forward here, with of course, the guidance and approval of Sales Management:

    1) The user can Loss out the original Opportunity, and create a new one with an editable Amount field
    2) The user, with the help of an Admin, can clear out the Opportunity Products on the record.

    This decision will have to be made by the Sales Management with consideration with the other executive teams involved in the Opportunity Sales Cycle.

    When selling Software as A Service (SaaS) in an ARR (Annual Recurring Revenue) world, the Opportunity Amount field is usually a good indicator of what the Invoice Billings will be, but not necessarily what the MRR is (monthly recurring revenue), or value of the contract is worth. Sometimes it is better to have your own field value, such as MRR from the opportunity products, that can determine was the ARR of the record is, while the amount field can be left for billing/invoicing purposes.

    If you have any questions on the above,  please let me know in the comments below!

  • How to Add the Case Comment Section in Salesforce Global Search

    As a Salesforce Admin (or in other related operational roles), I strongly believe that your goal should be there to support, educate, and empower your users to solve their own problems in the future. The reason I enjoy what I do so much is that I absolutely love learning new things, and also that I enjoy sharing what I know with other people. With that said, a long while back, I had a request I’ve never experienced before:

    Email asking to show case comments.

    When this type of situation happens, where I don’t have a ready answer, I try to step back and say to myself, “What are they asking, exactly?” What I like to do initially is to get more information, like stopping by their desk, having them come over to mine, or teleconferencing in if we are working remote from each other. The user gave me a quick call prior to sending this, and I asked them to send me a quick email so I can add it to my list of to-do’s to follow up on.

    Once I worked through some high priority tasks, I was able to focus my attention to this ask.  Starting off, I went Googling to familiarize myself with the issue. In our brief conversation, they explained about seeing Case Comments in the Global Search section. The first link led me to a Salesforce Ideas post, asking for this very feature: (How To) Include Case Comments in Search.

    Including Salesforce Case Comments in the Global Search Results

    As it turns out, this very feature was delivered in a Salesforce Release, with the comments appearing around some 7 to 10 years ago. I did another quick search, and found some release notes around the same time describing this functionality. Back in the Spring ’12 release, Salesforce allowed the ability to provide a smarter global search feature. Reading more about this release, this ‘smarter global search’ allowed users to broaden their global search results by selecting the “Search All” link from the sidebar:

    Salesforce Global Smarter Search Feature
    Clicking the “Search All” link will open up all searchable object types

    After clicking that link and expanding the results, you can see what other objects have results for your query, and can be included in the search. Even better, you can even ‘pin’ the other object’s search field to the available globally searched records, if this is a search result a user will need access to time and time again. Start by hovering over the link, and clicking the ‘pin’ button:

    Salesforce Global Search Pinned Search Results

    Now it is pinned to the top of your search results! You also have the ability to Unpin if you do not want those results to be populated in the global search. Just click the pin next to the object you’d like to unpin, and select unpin:

    Armed with this knowledge, I reached back out to the user and asked to set up a quick 10 minute meeting. We did a screenshare, and I asked the user to show me what they meant by their request. They explained that when performing a search for a Case, they’d like to see the Case Comments in the results. They were under the impression that might not have the correct Org sharing rights to be able to view them. This could’ve been a different issue, but thanks to being prepared with the help of the archived Salesforce Ideas, Release Notes, and Google – I was able to walk the user through how to solve their question and find the case comments. After that, I was also able to show them that they have the ability to pin that object record search type for future reference, making their life easier! It was a great learning experience for me as well – If I ever get the same question, I have the answer ready to share!

    Note: This Pinning function of Global Search does not update for all users of your Org. Each user can customize their Global Search results by pinning whatever Object Record they need access to.

    Let me know your thoughts in the comments below!