Category: Salesforce

  • Campaign Member First Associated Date/Time Field

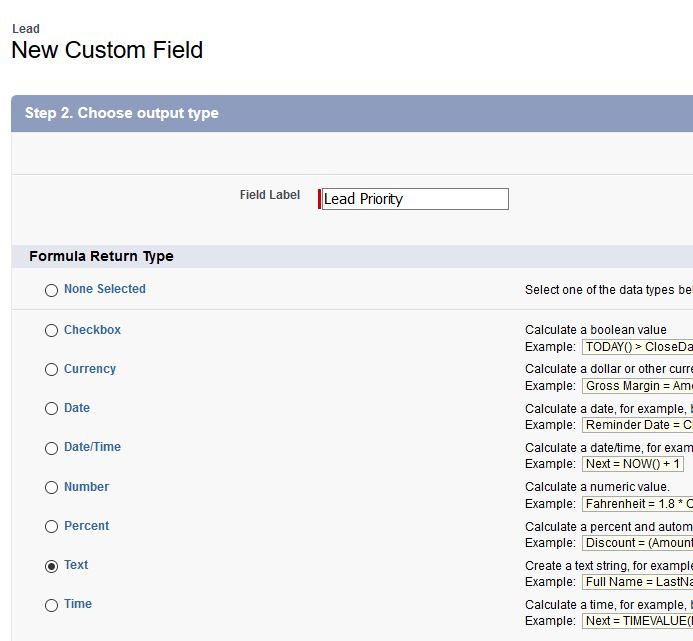
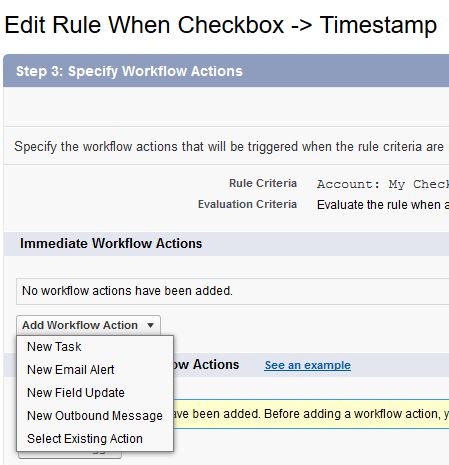
    Have you ever noticed the difference between the Member First Associated field on the Contact’s Campaign History Related list is a Date/Time field, but if you were to reference the Campaign Member’s First Associated Field on a report, it is just a date field? We want to be able to compare in a report which campaign member was first associated (read: Created) if they are on the same dates. This question came up today, and thought I’d quickly share how we solved this issue. (Thanks for the article idea, Michelle!). This post will show an easy way to run as report of the Campaign Member First Associated field as a Date/Time Field.

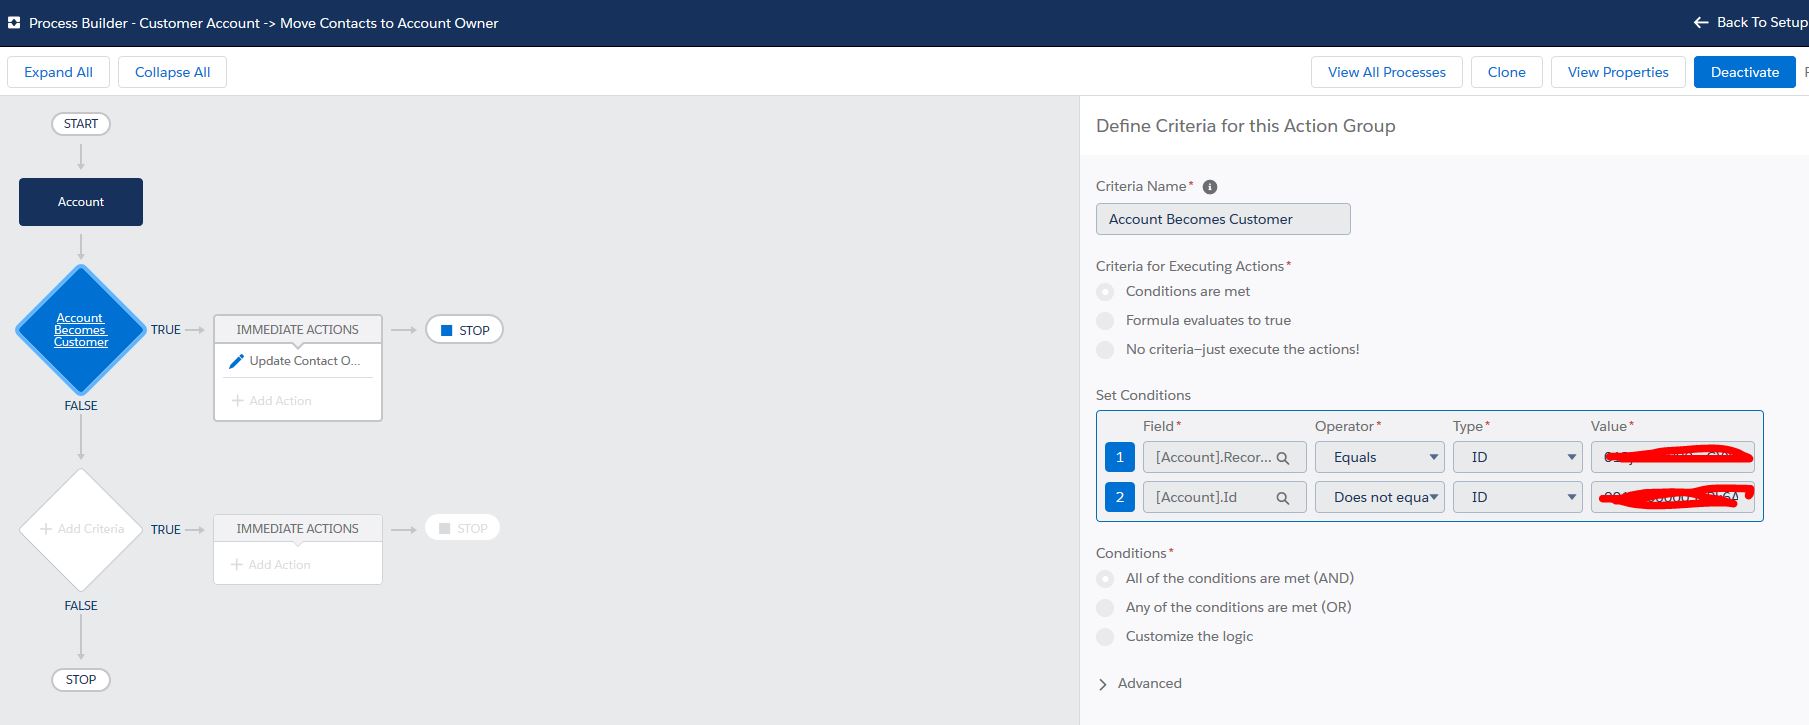
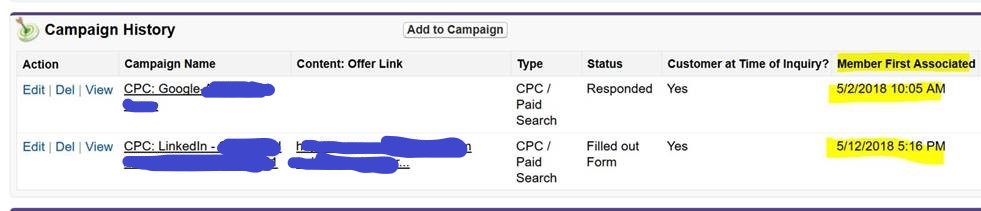
    Before we begin, here is an example of the Campaign Member First Associated field on the Campaign History Related List that is a Date/Time field:

    Contact Campaign History Member First Associated Date/Time Field

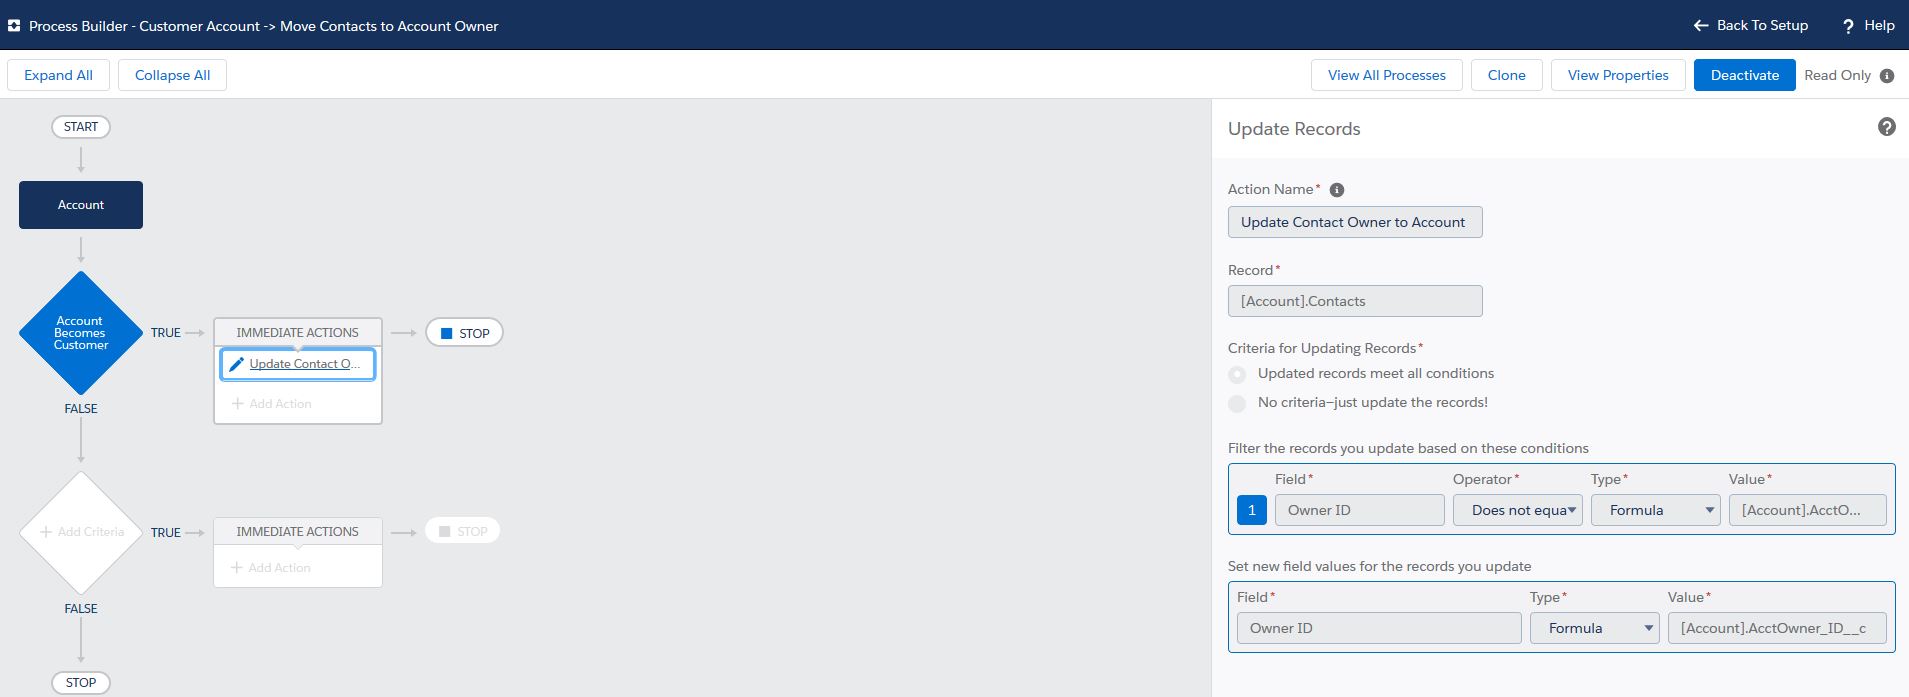
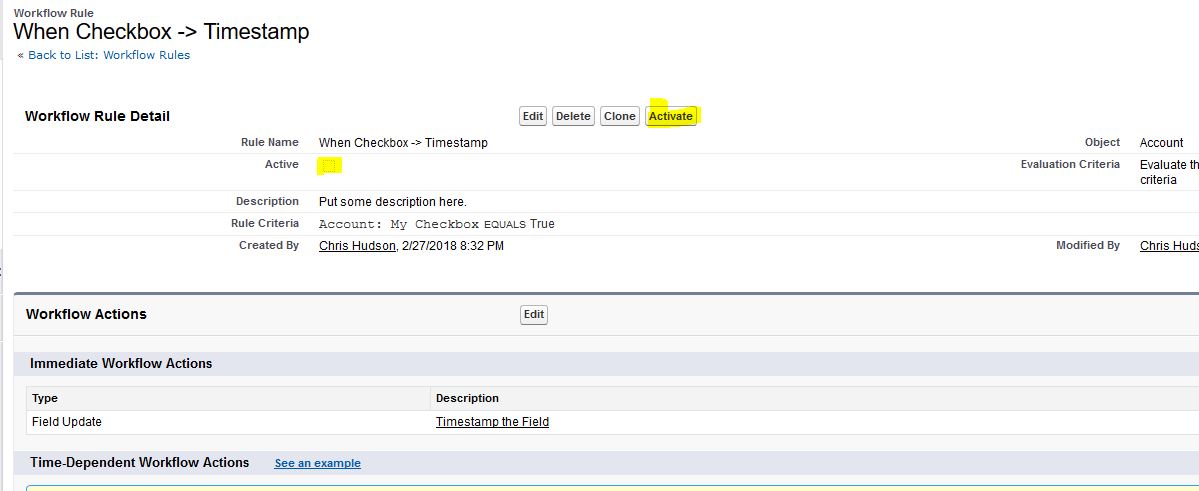
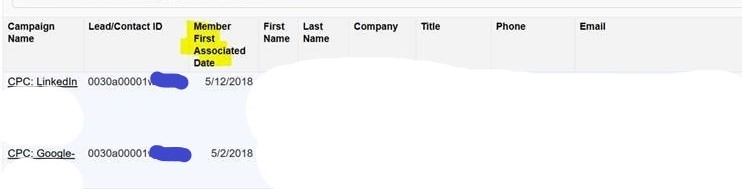
    And here is the same Campaign Member First Associated Date field on a report that is only showing as a Date field:

    Standard Member First Associated Date in Reports different from Campaign Member

    This is very odd! Let’s quickly fix this by creating a new field. We’re going to look up the date/timestamp of the creation of this Campaign Member being associated with the Contact.

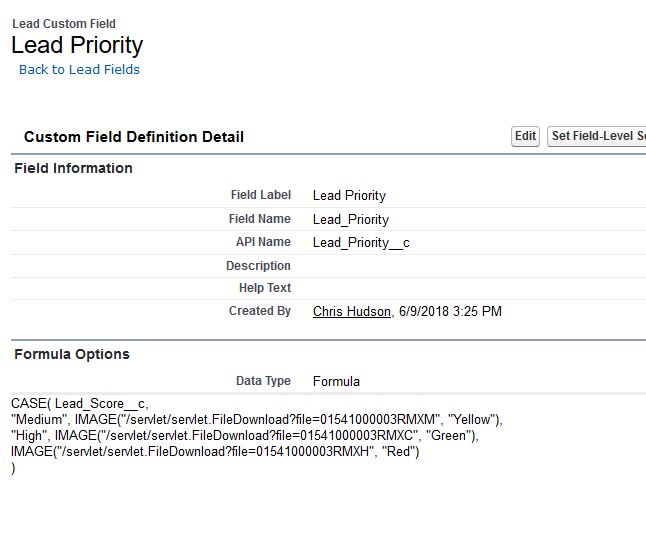
    Note: This post is a follow up to the Campaign Member First Associated Timestamp article, where we go over that the Campaign Member First Associated Date is actually the “Created Date” of the Campaign Member associated with a Contact. If you’re confused why that is, check the article out.

    How To Run a Report of the Campaign Member First Associated Field with Date/Time

    In the above article, we know that the Campaign Member First Associated field is actually the ‘Created Date’ of the Campaign Member record associated to the Contact. The problem is that the Created Date is also not easily reference-able on a Campaign Member report for some reason. I don’t know why this is the case. To be able to run a report of the Date/Time field of the Campaign Member First Associated date, we need to create a formula field referencing the created date and displaying that as a date/time field.

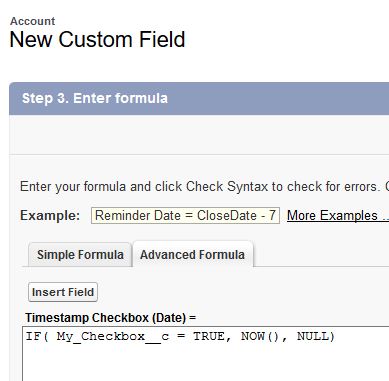
    Creating a Date/Time Formula Field for Campaign Member First Associated

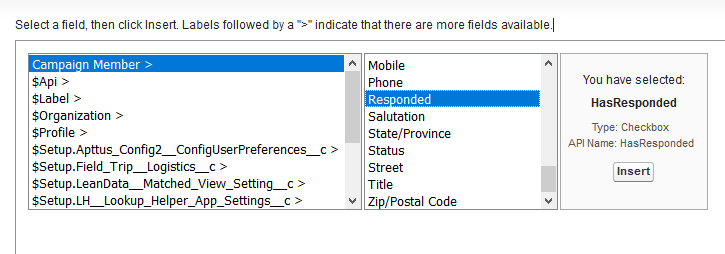
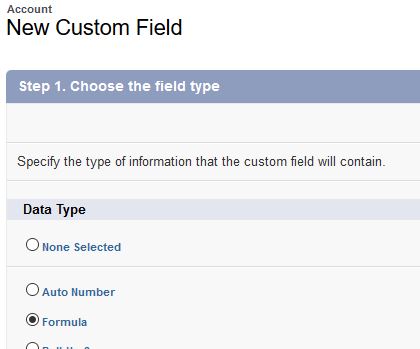
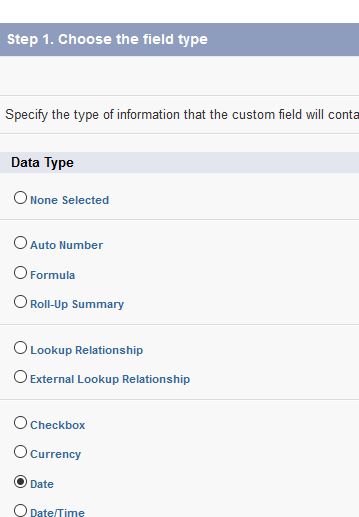
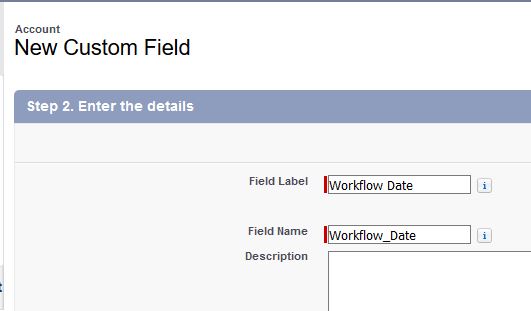
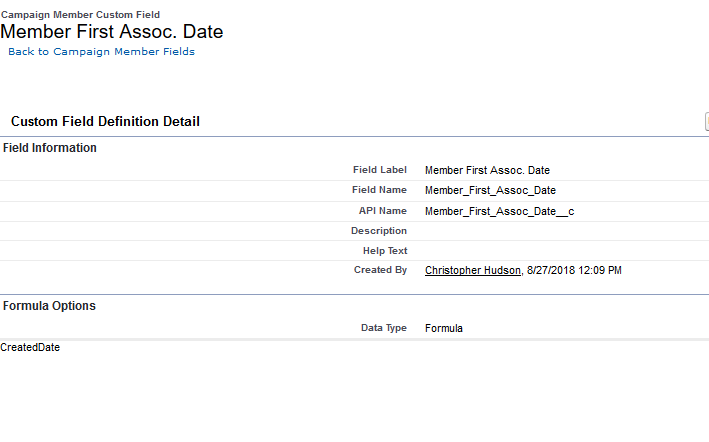
    First, let’s create the field. Select “New Field” from the Campaign Member object in Salesforce’s Setup. Let’s name it “Member First Assoc. Date”. Select the type to be Formula, and Date/Time as the output. The formula is simply the “Created Date” of the Campaign Member. In the Formula Editor, you can either look the field’s API up, or just type “CreatedDate”. Now, let’s check the syntax, and then save the field if there are no errors. On the next step, you can choose to add this to your Campaign Member Layout if you’d like. If you only want to have it available in reporting, there’s nothing you need to do to make it available. Last step is to save the field. You should now be greeted with a new field record that looks like the below screenshot:

    Date/Time field of Member First Associated for Reports

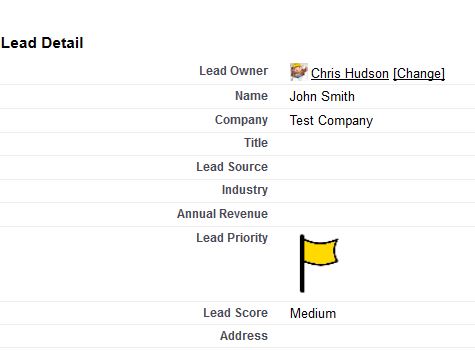
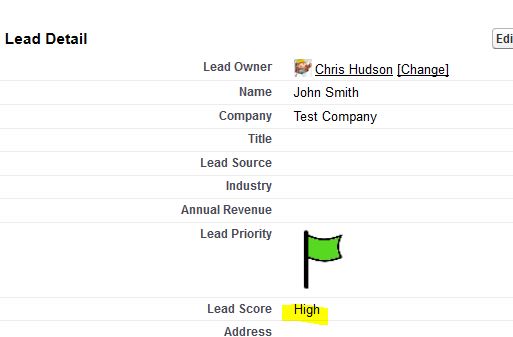
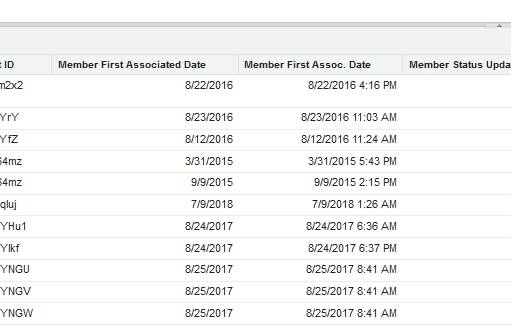
    Now, when you run a standard Campaign Member report, you will see that the Campaign Member First Assoc. Date is correctly pulling the Date/Time field.  You can now run a report to compare different Campaign Members First Associated Date and view them as a Date/Time fields, seeing which Campaign Members were created first, even if created on the same day,:

    Report with new Campaign Member First Associated Date/Time Field

    I don’t know why this is one of the weird quirks of Salesforce, but believe it was a legacy feature. I hope this article helped you if you had the same confusion! As always, leave me a note in the comments below.

  • Salesforce Change Management Best Practices

    After speaking with a colleague the other day, they asked me what are the best practices for change management within Salesforce. This article will dive into how I manage changes in Salesforce using a Salesforce custom object used to build a Change Request app.

    Salesforce Change Management Methodology

    The reason that change management is important is for several reasons; we want to continually keep metadata clean, remove unused processes, and manage our storage effectively. Also, being able to track and prioritize requests helps keep your company’s overall initiatives moving forward. I’ve been the main administrator of a Salesforce Org that went live in December, 2000. As of this writing, that was almost 18 years ago – back when Salesforce was first founded. As I’m sure you can understand, there were fields, apps, and components within that Org that were no longer used and were filling up storage space. One example was the activity history. We were using over 5 GB of that, with them ranging from “Call: Not In” from back in 2004. Do we really need this data?

    Using a custom object (or leveraging the Case object with a unique Record Type), you can easily build a tool within Salesforce to track, approve/deny changes, and have a historical reason of “WHY” you built a certain field, process, email alert, workflow, etc.

    Salesforce Change Request Template

    The template I use to manage the change has a few components, which can easily be updated and extended to your particular Org’s needs.

    Template of Salesforce Change Management

    A. Change Request Name:

    This field provides the name of the change request, which, at quick glance, should display a high level overview of the objectives of the change from the requestor.

    B. Change Stage/Status:

    I use the below drop-down selections to understand where a change is in it’s life-cycle.

    -Not Started
    -Approved
    -In Process
    -Completed
    -Denied

    Here, you can have workflow rules & approvals. When a change is created, it can send me an email of a new change with some of the information. I can quickly take a look and approve/assign it to the appropriate person to follow up. In rare cases, I will deny a request. Once approved and assigned, it will be moved to in process until completed.

    C. Change Requestor:

    This field is used to understand who is requesting this change, and is used to send an email alert when it was successfully logged, and can email when completed/denied. This closes the loop for the parties involved.

    D. Change Date Fields:

    Two important date fields I leverage are:

    -Date Requested: This field is updated when a Change record is created.

    -Date Completed: Once stage is marked to completed, it will update the date field to TODAY(). This is when it is moved to either Completed or Denied.

    E. Change Owner:

    Who the Change owner is assign to complete the task. When the ownership is changed, an email alert can go out to update the assigned owner. All changes are assigned to me as the owner, and then I can easily update that and have an automated email go out to the newly assigned owenr.

    F. Change Description:

    This field is required to create a change. The change requestor will fill out what is being asked. These projects can be something that can take as little as 5 minutes, such as adding a picklist value to a field, to up to several months – such as tracking a project and the sub-requirements of that project. Sometimes changes prompt the need for more information, and this can be tracked in the notes/attachment related list of the record, or as a working revision in the ‘results’ section.

    G. Results:

    The result field is used to explain the methodology used to perform the task. Typically what is included the URLs of the fields, the field names, and any other comments relating to the results. This field is very important to use for historical tracking of why a field was created, and what are all the components of the change that were used to solve this particular initiative.

    Salesforce Change Request App

    Instead of recreating the wheel, you can also easily download a change request app from the Salesforce AppExchange. The app I use is called Change It. I wanted to give a shout out to CloudLogistix who created this app back in 2007. I still use it to this day. You can, of course, easily create a custom object or update the Case record to solve this, but out of the box it works great, and has the majority of the above fields & created list views. You will need to have an admin create the workflow rules and email alerts, but it is great if you don’t want to hit the soft limit of the allowed workflow rules.

    Hope this has shed some light into how I handle change management in Salesforce. If you have any questions or comments, please don’t hesitate to reach out to me at the contact form or in the comments below!

  • How to Insert a Salesforce Image Using a Formula

    Being able to insert a salesforce image using a formula is very easy to implement, and can act as a visual cue for a variety of use cases. Recently, I had a request to flag accounts with bad payment statuses on a custom object record used by the implementation team, because at a certain point the customer’s access would be restricted causing the engineer to be unable to have meetings with the end users. Other reasons for using visual representations can be showing where an opportunity stands (red, yellow, green) when closing, using a lead score to see how hot the lead is (with flame images), or using an account score and how close a prospect is to your ideal customer profile (with stars), etc. Adding a field to Salesforce that will display as an image requires a few steps, but we’ll walk through it with screenshots below.

    How to Insert an Image in Salesforce

    To insert an image in Salesforce, we’ll first have to upload the image into Salesforce. The recommended way is to upload the image in the Documents Tab. To head to the documents tab, click the plus sign in the menu to view all tabs. Then select the Documents tab.

    The second step is to create a read only public folder visible to all users, or take an existing folder and set the access to ‘read only’ accessible by all users. I’ve named mine SFDC Images below:

    Now that we have the folder set up, we’ll need to actually upload the pictures. I searched Google for a white flag Icon that was free (creative commons), and downloaded it to my computer. From there, I painted in some colors (green, yellow, red, black), and shrunk the size down a bit. Here they are if you’d like to use them in your own Org:

    Next, you’ll want to create a new document, and give it a name. Make sure you have it saved in the public “SFDC Images” folder. From there, upload the image by selecting ‘browse’ in the second section. Do this for all the images you want to upload.

    Creating Green Flag in Salesforce Documents

    Now, you want to click ‘view file’ to get the url. We’ll save everything after http://[…].content.force.com (what you will be copying is the /servlet/servlet.FileDownload?file=01541000003RMXC‘).

    Salesforce Document ID

    Once we have the location URLs saved for all images, we can create the field that will display them. Select the create new Field on the Object you want to display the images. For this example, we’ll create one on the Lead Object.


    Select type “Text” for the data the formula will return, and give it a name:

    In the formula builder – we’ll want to go to “Advanced Formula” tab. The formula I’m making will be using the CASE logic.

    Custom Salesforce Formula Displaying Image


    What this formula does is lookup the Lead’s Score, and if the picklist value is ‘Medium’ , it will display the Yellow Flag. If the Lead Score = “High”, it will display the Green Flag. All other times it will display the Red Flag. The Image function has two variables, the URL of the image, and the name of the image. Here is the formula below if you’d like to copy and paste to update yourself.

    CASE( Lead_Score__c,
    “Medium”, IMAGE(“/servlet/servlet.FileDownload?file=01541000003RMXM”, “Yellow”),
    “High”, IMAGE(“/servlet/servlet.FileDownload?file=01541000003RMXC”, “Green”),
    IMAGE(“/servlet/servlet.FileDownload?file=01541000003RMXH”, “Red”)
    )

    Save the formula, and add it to your page layout on the record type you want to display it on. Once you have updated the layout, let’s validate this by going to one of our ‘test’ records, and moving the Lead Score and verifying that it works. Congrats! You’ve inserted an image into Salesforce using a formula.

    Testing if the lead score is medium:

    Testing if the lead score is high:

    Has this helped you out at all? Let me know if the comments below! Also, if you have any other use-cases where you need to add an image that displays through Formula logic, please share it with me.

  • Campaign Member First Associated Date on Records

    If you had an issue finding the member first associated field on the campaign member, you are not alone. Here, the campaign member first associated date field is an available field column in the Campaign History related list of a Contact or Lead record:
    Salesforce Campaign Member First Associated Date Field

    However, if you were to try and reference this field in a formula, workflow rule, etc, it would not be not available in the options. For example, please see the below – this is a screenshot showing the picklist in the formula helper on the Campaign Member object:

    Available fields on the salesforce campaign member
    There is no field on the Campaign Member object with the label “Member First Associated”. Where did it go?

    How can this be referenced in the related list, but not reference-able anywhere else? As it turns out, this is because the Column header label in the related list is actually referencing another field.

    As it turns out, the Member First Associated Field is really just the Created Date of the campaign member!

    It makes sense when you think about it. A Campaign Member is first associated when the record has been created on the Contact or Lead record, as referenced through the related list. Let’s see how we can use it in a formula:

    Using the Campaign Member First Associated Date field in a Formula

    If you wanted to reference the Member First Associated in a field of a formula, it is very easy to do. Note: The “Created Date” field is a DATETIME field, and you may need to convert the DateTime field to a Date value if you are using it with another Date field like in the below formula.

    Using the Campaign Member Created Date field as a DateTime value to Date Value

    In the above, we have a simple IF statement seeing if the Effective Date field on the Account related to the contact is greater or equal to the creation date of the campaign member of the related Contact. If the effective date is greater or equal to the campaign member first associated date, we’ll have the formula say No, otherwise it’s Yes. What this formula is seeing is if the Contact was a member of a campaign on before or after the account became a customer. As a reminder, we use DATEVALUE() instead of DATE() because it will correctly convert it to a date field.

    I hope this article helped clear out some confusion of the Campaign Member First Associated field! Would love to hear your thoughts in the comments below, if this helped you out or not!

  • Mass Updating Salesforce Records with a Checkbox

    Sometimes you will need to mass update all or a subset of records in your Salesforce Org. Being able to mass update Salesforce records with a checkbox is one of my all time favorite admin ‘hacks’. The way to implement is to create a checkbox only visible to the System Admin profile, and use it with your favorite tool – whether it is using Data Loader, Workbench, X-Author, or Demand Tools to check that box – you can update a subset or all of your records. How is this possible?

    How to Mass Update Records in Salesforce

    There are many reasons to mass update records in Salesforce. Let’s say that you just created a workflow rule or used process builder to build a process that will update records when ‘created or edited to meet the criteria’. What do you do for the records that might not have been updated after this rule has been created? That’s what this checkbox is great for!

    After the workflow rule or process is built, you would need to make some sort of update to each record, regardless if the the criteria is met, to enforce the record’s rule or process is run. Let’s walk through the process of how to build this checkbox updater:

    First, let’s create the checkbox. In this example, we will create  this field on the Account object. We can just use the name, “Value is Updated?”. Have the default value of this field be ‘unchecked’. Let’s make this field visible and editable to only System Administrators, and assign to the Sys Admin page layout (if you have one available). The result will look something like this on your page layout:

    Checkbox to automatically update saleforce records

    Now, say you built a new workflow rule that will run anytime a record is created or updated to meet the criteria. You can manually go through each of the Account Records and make a slight edit on the page, to have the workflow rule run.

    But what fun is that?

    As an administrator, we like to automate as much as possible, and use ‘clicks not code’ to do so. In this situation, just pull a filtered report with all the account ids and this checkbox field. Once the CSV has been exported, let’s mark the checkbox as “True”. We do this by the 1/0 true/false statement, where 1 means true. Since the default is set to 0, we’ll set as one.

    Account IDs updated with the Value Is updated Checkbox

    Save the CSV, and pull open your favorite ‘bulk updating’ tool. I prefer to use Salesforce’s own Data Loader. Open up the Data Loader, and select the “Update” button.

    data loader salesforce open

    You will most likely have to log in. Once you login, you are able to select the object to update. In our case, select the Account Object and open up the CSV we just saved. Match the column header names with the corresponding fields in Salesforce, and confirm update:

    By making an update to a record through a field that has no real impact on business processes, this will then take a look at any Salesforce process or workflow rule, and will cascade the rule throughout all the records that were ‘updated to meet the criteria’. Congrats, your rule has been created and applied to all the records you had in the original report!

    What are your thoughts on this simple hack? As a Salesforce admin, do you have any other tricks used to make your life easier? If so, share them with me in the comments below!

  • Process to Automatically Change Contact Owners to the Account Owner in Salesforce

    How can you align the contact owner with the account owner in Salesforce, automatically? There are many ways and reasons to do this, and unfortunately, is greater than the scope of this article. These Salesforce support requests below cover some of the use cases for this feature:

    We’ll focus primarily on creating a process to update the contact ownership to the account owner when a record is created or updated to match a certain record type. In our scenario, let’s just say that we need to have all of our Customer Contacts be the same owner as the Account Owner – regardless if Support, Finance, Marketing, Sales, Order Operations, or any other members of your organization creates a contact associated with that account record. This process will also trigger if you move account ownership from one user to the next. Here is an example request I’ve received:

    Account Ownership Change Request Salesforce

    How can we create a process to transfer ownership automatically, rather than manually?

    Using Process Builder to Update Contact Owner to Account Owner in Salesforce

    Using Salesforce Process builder makes this requirement very easy to implement.

    NOTE: If you are using several API only integration users that have access across your Org, and have many contacts associated with an Account, you may run into errors such as Too many DML rows, or the ALL_OR_NONE_OPERATION_ROLLED_BACK error. In these scenarios, you can update the Process Builder to exclude the Account IDs of accounts that cause problems, or limit the integration user from access these records.

    Starting off, I’ve already created a formula on the Account Object to view  the Account Owner Id on the Account Record. If you aren’t familiar with how to do this –  create a new formula field on the Account record to pull that ID using “CASESAFEID” similar to the below image:

    How to Get Account Owner Id In Salesforce

    Got that all set? Perfect, now let’s pull up the Salesforce Process Builder, and click the create a new process. Let’s give it a name and give it a  description. (our click path would be Setup->Create->Workflows & Approvals->Process Builder). Click “new” in the top right corner. Give it a name and description. When you get to the drop-down for”The process starts when”, we’ll select whenever a record changes.

    Salesforce process builder contact owner to account owner

    What this will do is whenever an account record changes, it will invoke our process. Our second step is to add the Object that will be changed to our process. We’ll select the Account object, and set it to run whenever a record is created or edited.

    For the next step of our process, we want to have the criteria condition be that an “Account Becomes A Customer”. To do this, we’ll pull the Account Record Type ID and have it equal to the Customer Record type we’ve set in our Org. Here is where you’ll also want to eliminate accounts that may have too many contacts. You’ll see that in the below as Account ID “does not equal” :

    Salesforce Process builer - customer account ownership to contact ownership

    After creating the criteria condition in the above, the next step is to “Update the Contact Ownership”. To do this, we want to filter the criteria to only include Contacts whose ownership is not equal to the account owner. In the below, you’ll see how we set that the Contact Owner ID =! AcctOwner ID. The new field value that we’d update will have the owner ID be a formula, which will pull the account owner ID and set that as the contact owner ID :

    Salesforce Account ownership = Contact ownership

    The reason we have the contact owner not equal to the account owner id in the filter criteria is so the process does not unnecessarily update contact ownership that already  is owned  by the current account owner.

    Our final step is to activate this process, and use a Customer Record Type to test the process and confirm that it works. Congrats, we’ve successfully created a process to ensure that all contacts are owned by the account owner!

    Do you have any issues updating contact ownership with an account? Reach out to me in the comments below!

  • Generating a Geographic Heat Map with your Salesforce Account Data

    Are you trying to find where your top customers or prospects are located geographically? Being able to visualize this data in a heat map can help you figure out your top target customers, manage territory realignment, increase headcount in a certain area, and many other use cases. This article will go over how to generate a geographic heat map by using Salesforce Account Data, in particular, we will be using just the Zip Code information of account records.

    This tutorial uses Google’s Fusion Tables that can be a accessed from your Google Drive. What is phenomenal about Fusion Tables is that it is a great visualization platform that can create bar charts, pie charts, and what we’ll be using – Geographical maps – from any source of data you provide.

    Getting Started with Google Fusion Tables

    You can possibly skip this section if you already have access to Google’s data visualization tools. To get started, we’ll first head over to Google Drive. If you don’t already have a Google Account, go ahead and create one. Once there, we’re going to have to connect Fusion Tables to your drive:

    Connecting Google Drive Fusion Tables

    As you can see in the above image, I have already connected Fusion Tables, but if it’s your first time – once in Google Drive, Select “New” and  then”More”, from there, click the ‘connect more apps’ for the search screen to show up (below). Once it does,  search for “Fusion” and click ‘Install’ next to it to associate with your Google Drive:

    Associating Google Fusion tables to Google Drive

    Congrats, your Google Drive now has Fusion Tables! This next section will briefly go over exporting a report in Salesforce – if you already know how to do that, feel free to skip to the section after that.

    Exporting a Salesforce Report

    Next, you’ll want to have an export of the data you are trying to visualize. You can get that data by creating a report in Salesforce, select the Account Report type, and pull out any relevant data within the filters. We opted for Dummy Customer Accounts in our Sample Zip Data CSV. In the columns of your report, specify ‘Zip Code’ as one of the data points that we want to export. The Zip Code data will allow us to map with the help of Fusion tables & the Google Maps API. Once your report is created, let’s export the report as a .CSV.

    Now that we have our data, it is time to upload this to Google’s Fusion Tables.

    Using Google Fusion Tables to Create a Heat Map

    Let’s fire up a new Fusion Table. Go to Google Drive, and Select “New” -> “More” and then “Fusion Tables”. Once there, it will prompt you to Import a new fusion table. Select the CSV of the report that was generated earlier. As the data populates into the Fusion Table, it will look like the below:

    Uploading Sample Zip Data to Fusion Tables

    By default, the table will associate the ‘location’ as the target data point to visualize (do you see how the United States Country is highlighted?). It is easy to adjust a different column to be the data source. Just hover over the area at the header of the column, and click the arrow as it appears, and select ‘Change…”.

    Moving Fusion Tale Column Location to Zip

    This will allow you to adjust the data ‘type’ of the column to be Location (from the default “Number” that Fusion Tables associated it with).Change Zip data point to location

    Now that the Zip Code column is referenced as a location, in the “Map of Country” tab, we’ll select Zip as the location. Once you select this, Fusion Tables will start Geocoding for you.

    Geocoding in Fusion Tables form Zip

    After Fusion Tables has finalized the Geocoding, you will see a plot map of your Zip Codes:

    Fusion Tables Point Map

    It is very easy to adjust the map from displaying ‘plotted’ points to a heat map. In the left side bar section, Click “Heatmap” under “Feature map”:

    Fusion Tables - Adjusted Heatmp

    As you can see in the above image, we’ve successfully created a heat map! You are easily able to adjust the radius and the opacity of the map from this selection, making cities larger or darker should you prefer. It appears the majority of our sample Customers are located in Tampa, Atlanta, Philadelphia, Toronto, & New York. If our purpose was to visualize what cities we’d need to have a resource location near, this heatmap can easily serve that purpose.

    Feel free to reach out if you have any additional questions. If you have other uses for Fusion Tables or use-cases for Heatmaps, please leave them in the comments below!

  • Two Ways to Populate a Date Field Based on a Checkbox in Salesforce

    There are a few ways that you are able to implement timestamping a date field based off of checkbox in Salesforce. This article will go into two different ways to solve this requirement, and in between will discuss the trade-offs between using each potential method.

    Automation of timestamping has a variety of uses. This process can be used to track different stages of an opportunity’s lifecycle, figure out when a field was last updated, setting a future task, and many more use-cases.

    From a timestamp, you are able to report on the exact date a closed opportunity was created, qualified, and when a user sent out the quotation. You can also use the timestamp to set future follow up date on the field. Lastly, you can figure out the last time the field was updated, and follow back up on those Accounts/Contacts, or Opportunities that may have become stagnant.

    How to Timestamp a Date Field in Salesforce

    The two ways to timestamp a date field in Salesforce are:

    1. Creating a formula field that updates to now or today.
    2. Using a workflow rule and a field update.

    In the first section, we’ll go into how to use a formula field to manage this requirement.

    Method #1: Creating a Formula Field to Timestamp a Date

    The first method of timestamping a date field is to make a formula field that will return a date. This is assuming you’ve already created the Checkbox field. Let’s create our new field, and set the field type to “formula”:

    Step one of creating a new Salesforce Formula Field

    We’ll want the formula to return the output as a “Date”. Don’t forget to add a field label/name!Step Two of creating a new Salesforce Formula Field

    In this field, you’ll want to set it up with the following formula:

    IF( checkbox_field__c = TRUE, NOW(), NULL)

    Where the checkbox_field__c is the name of the checkbox field you have.

    Step Two of creating a new Salesforce Formula Field to timestamp a date field

    What the above formula does is see if the Checkbox we created is checked (or True in the above), and it will make the formula return the date as date “Now”. This method is great as it is relatively straightforward formula to timestamp the date, and unchecking the Checkbox Field will remove the date.

    What if you wanted to keep the date until removed by a System Admininistrator or other user? That is the one caveat the formula field has – if  the checkbox is checked, the formula will give (and keep) whenever NOW was. On the other hand, if the checkbox moves to unchecked, it will remove the date field in the formula. In the next method, using a field update will keep the date until removed by a user.

    In the next section, we’ll go into how to use a workflow rule and field update to manage our requirement of timestamping a date field.

    Method 2: Using a Workflow Rule & Field Update to Timestamp a Date

    Using a workflow rule & field update that can timestamp a date field is a little bit more work to implement, but does not have the draw back of the formula method. Removing the checkbox will cause the formula to not return ‘true’, and can erase valuable historical data down the line.

    First, we’ll just create a ‘date’ field. Again, we’re assuming that the Checkbox field is already created:

    Next, we’ll want to create a workflow rule. We start this by selecting the object that we want the rule to apply to. In our case, it is the Account object.

    The next step is to give it a name, and decide the evaluation criteria.

    Part of the rule criteria process is seeing that the checkbox we created, “My Checkbox” turns true:

    What a workflow rule does is that it takes a look at conditions, and if true, provides actions. These actions can be sending emails, updating fields, creating tasks, or creating an outbound message. In our case, we’ll want to create a new field update. What this will do is tell the workflow rule to update the field that we will define.

    Here we tell the new Field update to timestamp the Workflow Date field with the formula, which is just “Now”:

    Once that has been created, let’s activate the workflow rule:


    Now that the workflow rule & field update have been built and activated,  let’s just verify that it works by checking the box on the Account page:

    Congrats, it works!

    Differences and Use Cases:

    Each of the above methods are two distinct ways that can have varying use cases that are different in each circumstance. There is actually a third and final way to solve this requirement, and that follows the KISS Principle. Keep It Simple. After learning about the requirement from your end user, sometimes all that is needed is one person or a team of people to take ownership of the dates. We solve this by simply creating a date field, and locking it down to specific User Profiles or lock it down completely, and provide access through permission sets.

    Which method do you use to timestamp date fields? Let me know in the comments below!

  • Account Based Scoring Methodology in Salesforce

    Having a robust Account-Based Scoring Methodology in Salesforce can help you separate the wheat from the chaff in your prospect accounts. This will allow your sales team to quickly follow up on leads that might have a low lead score, by prioritizing the account fit in your target market.

    Account based scoring is similar to Lead Scoring Methodologies, which are, in essence, just an individual score for a single person (in Salesforce as an email contact/name/etc). Key components of a Lead Score can be whether this ‘person’ is downloading content from your site, visiting key pages and/or many pages in one session, how frequently they visit, and other key factors.

    NOTE: I will be sure to elaborate more about lead scoring best practices in another article in the future, so stay tuned!

    Likewise, if you are able to discern what your target market Customer company looks like, you will also be able to score these accounts. Some key components are easy to find, and others, not so much. For example, things such as Location, Employee Size, Industry, and Revenue can help you zone in on which companies you are a best fit with. Some of these factors should be relatively easy to identify and locate the accurate information of. For example, if you are located in the SF Bay Area, and you are a service company, you may want to score an Account higher if they are within your service location. Similarly, if you sell analytical software for tracking visitors on ecommerce websites, knowing that your prospect’s industry is Ecommerce (they use Shopify/Bigcartel/Magento, or some other ecommerce software)  would mean that they, more often than not, could be within your target demographic.

    There is other data that may not be so easy to find out. For example, say you sell a bolt on plugin for users of Microsoft Outlook. Knowing that your prospect has that software as their corporate-mandated email service would most likely include them as a fit within your target market. There are multiple vendors who can provide this data [for a fee] that I have had experience working with, such as Builtwith, Datanyze, Hunter.io, and HGData.

    The exercise of identifying key components of your target demographic will be left to another post. What is relevant here is that this data can also be included in an Account Based Scoring Model.

    Creating an Account-Based Score in Salesforce

    Creating an Account Based Score in Salesforce, in practice, is easy to implement. After you’ve identified the attributes of your target customer, you can then start tracking that data. You’ll first need to have fields that you can capture the relevant data in. Let’s create four sample fields in a hypothetical scenario, where each will have four picklist values as well:

    A) An Industry field with picklist values of:
    -Software
    -Real Estate
    -Distribution
    -Service

    B) An Employee Size field with picklist values of:
    0-10
    10-99
    100-999
    999+

    C) A Location field with picklist values of:
    -United States
    -Mexico
    -Canada
    -Canada

    D) A Revenue field with picklist values of:
    -$0-$100k
    -$100k-$1mm
    -$1mm-$10mm
    -$10mm +

    NOTE: In practice, these fields may not be necessary. For example, you can use the selection of “Billing Country” within Salesforce or another CRM to build out the scoring formula field in the next section.

    Account Based Scoring Best Practices

    For best practices, and to get the correct score on your prospect Accounts, each of the above picklist values can have an associated score as well. Let’s say we’re going to figure out the Account score on a 0-100 point scale, and we decided to give equal weight to the four scores to each of the fields that are attributes of your scoring model. We would then have to decide the individual score of each picklist value in each field above. We can give each picklist value a score of “0-5”, because we’ll be using the Salesforce CASE function in a formula on a each field as a score.

    To use the CASE Function to figure out the score of each picklist value, we’ll create four new fields: Industry Score, Employee Score, Location Score, & Revenue Score:

    For the each of the attribute fields, we’ll create the associated scoring field in the same process. As an example, we’ll just create the Revenue Score field here. Create a new field on the Account Object, and set field type as a Formula. Have the field return a number. In our hypothetical company, let’s say that we have found success selling to companies in the $1 million to $10 million dollar range. For small companies, with found only some success to selling to them if they have revenue with less than $1 million, but not as much as the sweet spot. Let’s also say that we don’t sell to enterprise or small seed stage startups due to long sales cycles and churn rate, respectively. We’ll say the our sweet spot revenue is a ‘5’, and the secondary revenue figure is a ‘3’, while the rest would be 0 (or null). To create the Formula field, we’ll set it up like this:

    CASE(Revenue__c,
    “$1mm-$10mm”, 5,
    “$100k-$1mm”, 3,
    0)

    What this formula does is look at the Revenue field (Revenue__c), through the case object, if it has the picklist value of “$1mm-$10mm”, it will return 5. If Revenue has a picklist value of “$100k-$1mm”, the Revenue Score will return 3. Now let’s save the formula. We don’t have to add this to any page layout. Do this for each of the other three scoring fields.

    To bring this Account Score all together, we’ll create another Formula Field that sums up the four Account Scoring fields. Let’s called this field Account Score. Since we said our Account Score will be based on a 100 point scale, and each account score is given equal weight, we can create the account score formula as follows:

    (Industry_Score__c + Employee_Score__c + Location_Score__c + Revenue_Score__c) * 5

    What the above formula will do is sum the values from the CASE formulas in each of the “Score” Field. Again, these CASE formulas will return a number based off the picklist selections of the Account Based Scoring model we developed. Since each picklist value will be scored as a maximum value of 5, if we summed all four score fields at the highest score, they would equal (5 + 5 + 5 + 5) * 5, simplified to 20 * 5, or return the score of 100 in the Account Score formula field above. Any picklist value of the attribute fields with a score below 5 will fall along the spectrum of 0-100 points.

    Once these fields are created for the account records, you can then add them to your Prospect and/or Customer page layout.

    Congrats, you’ve successfully created an Account Based Scoring Methodology in Salesforce!

    Let me know what factors you might have to identify your target customers in the comments below.

  • Building Custom Report Links in Salesforce

    How do you build a custom report link in Salesforce that can change the outcome of the report based on the record the link is viewed from?

    This article is a follow up from the Salesforce URL Hacking article I recently wrote. If you haven’t checked that out yet, or are a beginner in Salesforce URL hacking, I’d recommend reading it first!

    I had a requirement from a user that needed to see all relevant activity history of the Account page, and was wondering if I could build out a dynamic field that listed all the information:

    Salesforce Contact Replied field Request

    After meeting with my colleague and getting a better understanding of their requirement, we came up with the idea to have a dynamically generated report placed on the Account Page layout.

    How to Configure Custom Report Links

    The requirement from my user would be to show the relevant completed tasks on the Account in a report, based on whatever Account record that they were viewing. Creating this solution is known as a Custom Report Link in Salesforce. Custom Report Links allow an Admin to create a Report based on the Salesforce ID of the record the link is placed on. You are able to associate whatever other filters on the report, and have them appear in this custom link as well.

    The first step to create the Custom Report Link is actually creating the report itself. What you’ll want to do is go to the Reports Tab, create a new report, and open up the “Activities with Accounts” Report Type. You can easily do so by searching “Activities” in the Quick Find box.

    How To create an salesforce custom activities link report

    I sat with my colleague to figure out a specific account to develop some of the filters that they would consider “Notable Activities” in the Activity History section. We then created a report to include all the relevant filter information. For this example, we had the report filter look for all activities that had the subject contain “Call: Contacted”. Next, we added the Account ID of the specific account to the filter in the report. The ID was selected from the URL of the Account Record we were on.

    All Completed Activities in Salesforce Reports with Relevant Filters
    You’ll want to make sure that you are showing Completed Activities and that the Date Range is Null, so that it will search “All Time”.

    Once the report was created and showed the ‘Notable Activity’ of that specific account, we edited the filter so Account ID would equal “”. This should show zero results in the report. The reason that we do this will be explained in the next section. Before we head there, we must do two quick things:

    A) Save the Report with a unique name, and be sure to click the “Save & Return to Report” Button:

    Saving the custom report link with a unique name.

    B) Get the Report URL, and copy the Custom Report’s Unique Identifier:

    SDR Noteable Activities Report Link

    Creating the Salesforce Custom Report Link

    Now we’ll be creating a the Custom Report Link for the Account page. You’ll want to be in your setup, and in the quick find box type in “Buttons”. Next, find the highlighted link under Accounts:

    Buttons Links and Actions in the Salesforce Setup Menu

    We’ll be creating a new Custom Button or Link. You’ll now paste in the Custom Report Link you have copied in the section B from above:

    Customer Report Link for Account URL Detail Page

    Passing Parameters through the Salesforce URL.

    Are you familiar with passing parameters through a URL? If not, check out the Salesforce URL Hacking article. That should answer your questions you might have here.

    The parameters you can pass are considered a Parameter Value, or PV for short. In software development, all arrays start with 0 (Zero). The first parameter is the Subject, or pv0, and the second parameter, pv1, is going to be the second filter in our report. We are able to send the Account ID from the page the Custom Report Link is going to be located. If you had multiple parameters you wanted to pass, you can chain them in the Salesforce URL.

    Now we can save the Custom Link from above, and add it to the page layout.

    Salesforce Custome Report link on Account Page Layout for Noteable Activities

    When your users click the link in the above, they will be able to see the defined ‘Noteable Activities’ based on whatever Account Record they enter in from that custom link.

    NOTE: You’ll want to make sure that your users don’t change the custom report (add/remove filters, etc), or it can affect the functionality of the link. You could save the report in a folder that users have ‘view’ access, but not edit or manage access.

    Hope you enjoyed this article! Have you had any other Custom Report Links for alternate use cases? Please let me know your thoughts in the comments below.